Author: Charles Miske

  • Anaerobic Threshold Training

    What is Anaerobic Threshold Training?

    From a paper at Rice University:
    The AT varies from person to person, and, within a given individual, sport to sport. Untrained individuals have a low AT (approximately 55 % of VO2 max), and elite endurance athletes, a high AT (approx. 80 – 90% of VO2 max). You can train your body to remove lactate better and to juice up the aerobic mitochondrial enzymes, thus raising the AT.

    There is some controversy involved, and in fact some scientists believe that there is no actual biological effect in anaerobic threshold training. Despite that elite athletes continue to train rigorously to increase their heart rate and the amount of time they can tolerate being on the edge of failure. This is also called Lactate Threshold, or the exertion level at which your body switches between the aerobic and anaerobic energy production systems. As a generality the aerobic system is good for hours and hours of effort. The anaerobic system is only good for a short period of time, possibly only minutes, depending on the biology and genetics of the athlete.

    Anaerobic Threshold Training setup with Suunto Ambit 2S on the handle of the treadmill
    Anaerobic Threshold Training setup with Suunto Ambit 2S on the handle of the treadmill

    There are some tests to determine your heart rate at your Lactate Threshold, but I haven’t had one. I plan to this spring season so I’ll update this and more when I get there. From other common calculations my standard Max Heart Rate is 166 (220 – 54). I’m going to use 166 BPM as my estimated Lactate Threshold then. This is greatly flawed by the way. Don’t do this. I know for a fact I can spend a few minutes at 180+ BPM. I can spend about 30 minutes at 170+ BPM. I eagerly await that test. For your own purposes get the test. Some college sports clinics offer them for less than $150. If you’re a student even less. If you want to proceed anyway and hope for the best, be dang sure you have an awesome aerobic base first.

    A session of Anaerobic Threshold Training:

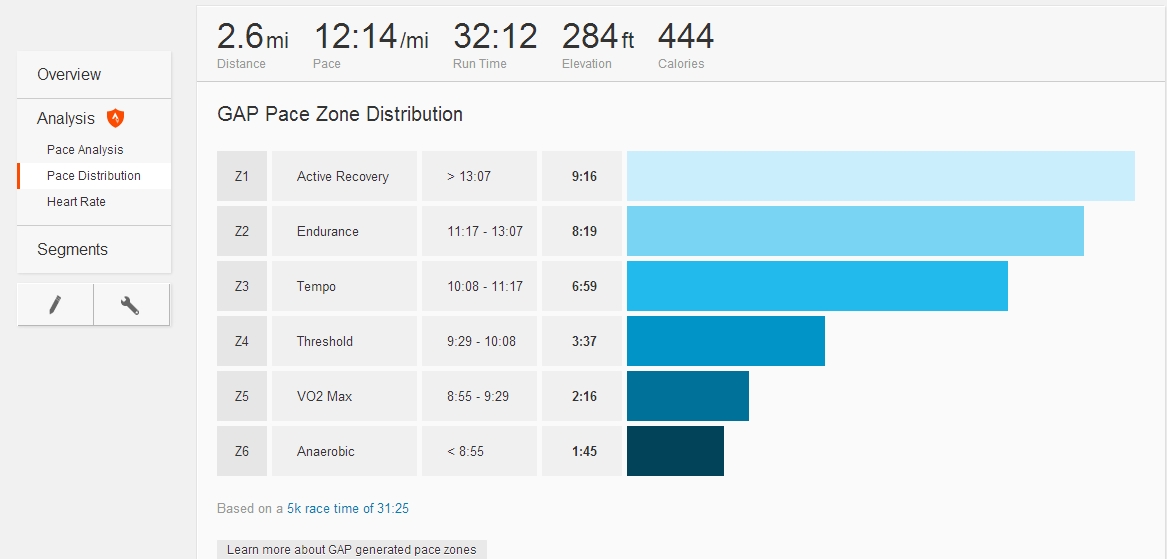
    My goal for this session is to spend about 30 minutes on a treadmill keeping my heart rate hovering around 146 to 149 BPM. That’s about 90% of my calculated MAX Heart Rate and 90% of my Estimated Lactate Threshold. Keep in mind that either number you go with is fairly severe for the average athlete. Not that I’m being all superior or anything, but I don’t want to get any messages or comments about strokes and heart attacks. If you can’t do a half hour at 75% or 85% you sure don’t want to try to go at 90% for any length of time.

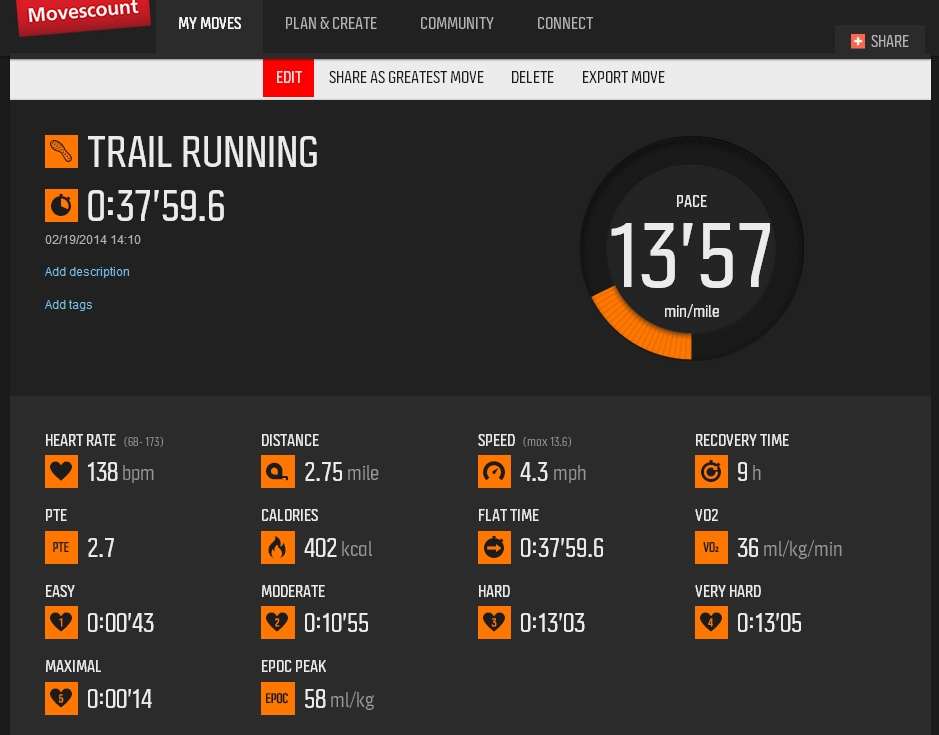
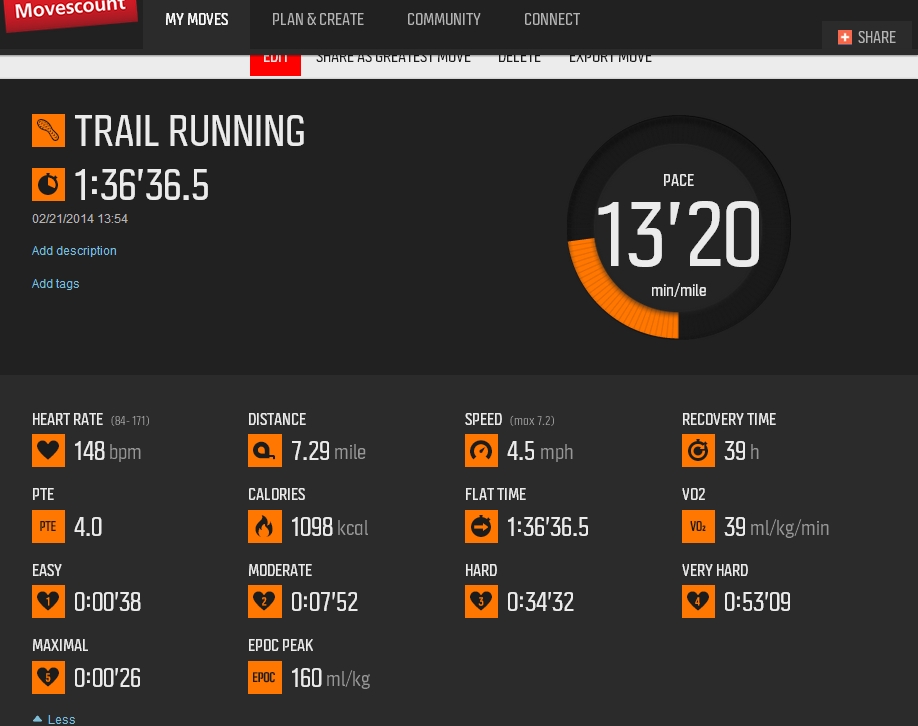
    I’m going to use a treadmill because it’s really easy to adjust the pace as needed to ride that fine line of Lactate Threshold. I used the Suunto Ambit2 S HR Watch which I received from an Instagram contest entry last Spring. I’ve grown to like it and have been using it in preference to my Polar RS800 I used to use. The Suunto has adequate Recovery Time estimates that help me plan my workout schedule.

    Treadmill Display after my Anaerobic Threshold Training session
    Treadmill Display after my Anaerobic Threshold Training session

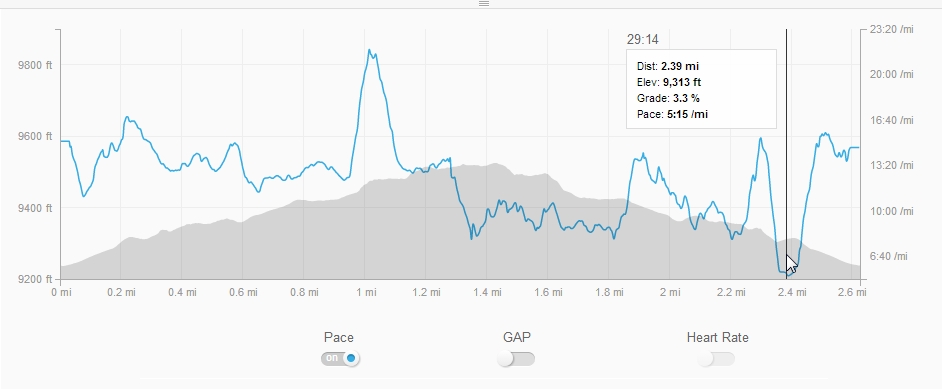
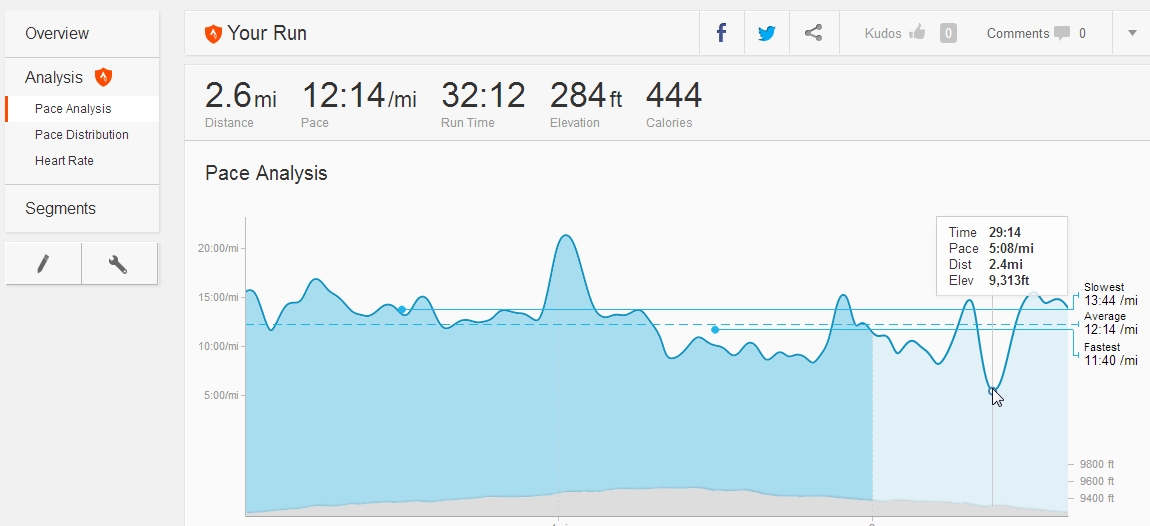
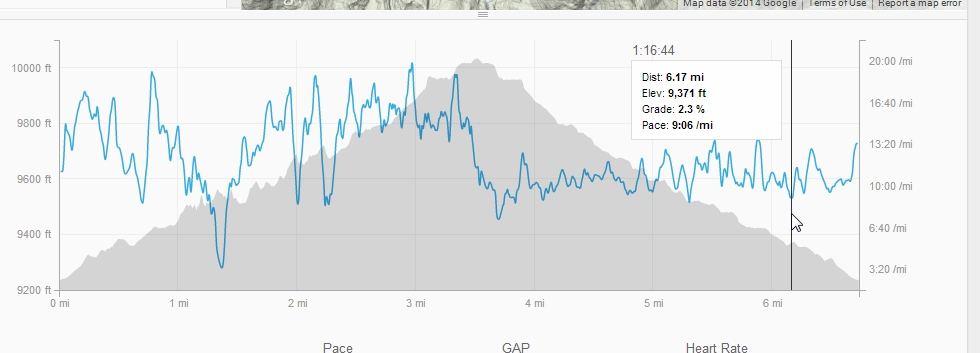
    I got on and spent about 20 minutes warming up gently at first and then increasing the speed until I got into the upper 140 BPM range. With the watch set on the handle right in front of my face it was easy to keep an eye on it without having to lift my wrist every few seconds. As you can see in the screenshot below I was able to keep my HR in that Zone pretty well level. I wanted to hit 5 miles in 60 minutes as a side goal. I recommend that if you’ve never done this before don’t set a mileage goal. You might be disappointed. Running at 10,000′ of elevation while holding your Heart Rate at 148 BPM is tough enough without adding in all kinds of other distractions like speed and distance goals.

    Movescount statistics from my Anaerobic Threshold Training Session
    Movescount statistics from my Anaerobic Threshold Training Session

    You might not have any issue with elevation, but even so, you’re probably used to drifting in and out of different Heart Rate Zones during a workout and being locked into one might give you fits. After you’ve done this a bit then you can start to set mileage and speed based goals. And that is actually one of the primary reasons for Anaerobic Threshold Training. If you cross fully into the Anaerobic Training Zone you will have only so many minutes left at that speed and you’re done. This is what gets a Tour de France rider into that final sprint. You ration your sprinting and use it in bursts saving for the big one. In fact I found a lot more articles about Anaerobic Threshold Training for riders than for runners. They love that power meter.

    Incline Treadmill Calculator Results from my Training Session
    Incline Treadmill Calculator Results from my Training Session

    So our goal in this training is to ride that 90% line for as long as you can. Ultimately you work your way up to riding that line for the duration of your event. You try to keep your Heart Rate below your Anaerobic Zone until the end and then you cut loose with energy in reserve to maximize your sprint. It’s quite common for someone in a race to spend their Anaerobic Reserves at the starting line and burn out way to early.

    My current training goal is Elbrus Race 2014 so I am working up to 3 hours. During that time I will slowly increase in speed and efficiency, as would you if you choose to train this way. In past years I trained somewhat haphazardly going for max speed and max distance and max elevation gained training. I burned out rather quickly since I spent too long in that Anaerobic Zone and it was unstructured. Last year, for Elbrus Race 2013 I changed my training drastically and stayed at a much lower Heart Rate during training and I did finish the race. My protege Todd Gilles came in 3rd place, which was quite satisfying.

    It has taken me a few weeks to work this out and get to the point where I could sustain that level of effort for that period of time and work out the technique of adjusting the treadmill to accommodate my Heart Rate Zone target on the fly. Supposedly there are some treadmills that will do this automagically, but electronics being what they are, and treadmill manufacturers not taking things as seriously as we do I can’t imagine great success with that. I suppose a drift of 10 BPM over the course of 5 minutes would be quite acceptable to them. We want nearly instantaneous response to our Heart Rate. This is best done by hand.

    Give it a shot if you dare. If you are ready to ride that 90% line and make it work. Please be careful though, okay?


    I just published a new article for my elite athletes training for Elbrus Race 2014 using Anaerobic Threshold Training as the base of this training cycle: [CLICK HERE]

    Slower cardio base training is a key element of my Couch to Colorado 14er Program. Build that cardio base and test it on a 4000 meter mountain. [CLICK HERE]

     If you want any help in your own training, check out my Consulting Programs. I’m available to get you where you want to be. [CLICK HERE]


    Update: In discussing this with my Facebook Page it became obvious that I need to add in a disclaimer. This is a very technical specific way of training. If you do not already know that you should be training this way, and understand why, it’s probably not a good idea to just sporadically do it without a good reason.


  • Ice Climbing Training Upper Body [archive copy]

    Part One of an in-season upper body Ice Climbing training program. You should alternate this with Part Two. Since this is an in-season program we’re not going to try to get stronger. Ice climbing training should assist the primary activity of ice climbing, but not take away from it. Proper strength training would require you to take 3-5 days off from training to let the muscles recover fully before training again. This would take away from your outdoor climbing fun, since most of the week you’d be recovering, and in the long run the load would be too high. Begin with about 5-10 minutes of a light duty warmup to get the whole upper body full of hot blood and nice and flexible. I like a full range exercise like the Concept2 SkiErg. You could substitute bands, which I’ll show you in Ice Climbing Training Upper Body Part Two.

    Ice Climbing Training: Warmup on SkiErg

    [youtube https://youtu.be/-Vdgr0vyhw0&w=640&h=360&rel=0]

    Remember, this should not be a workout or cardio. Just crank away till you’re nice and warm and your joints are soft. For most people 5:00 to 10:00 minutes should be good enough warm up for an ice climbing training session. I’ve actually gone without it a few times and been none the worse for wear and tear. But I do recommend it until you know your own body. My first exercise in this upper body program is a very light, fairly quick, nearly full range of motion power rack bench press. Since I’m alone I use a power rack to protect myself from dropping the weights. I set the safety bars about half an inch off my fully expanded chest. If you’re just starting out you might want to set it a few inches higher until you know what works best for you. I usually do a set of 25. I think anything from about 10 up will do, but if you can’t do 25 with pretty good form it’s probably too much weight for this type of in-season ice climbing training program.

    Ice Climbing Training: Bench Press

    [youtube https://youtu.be/zFTf0xbfvb0&w=640&h=360&rel=0]

    UPDATE:

    This is as far as it got when I saved it as a draft on March 13, 2014! I’m only putting it here for historical purposes and will get my new Ice Climbing Training articles up about once a week for the next few weeks. Remember, if you wanted the free pre-season General Physical Prep (GPP) training program – fill out this form. I’ll totally keep you in the loop.

    [grwebform url=”https://app.getresponse.com/view_webform_v2.js?u=BLe6u&webforms_id=3882204″ css=”on” center=”off” center_margin=”200″/]

    Remember – Train Smart and Hard for Best Progress!

  • Deadlift at Breck Rec

    I did a workout today at the Breckenridge Recreation Center CLICK HERE It’s just referred to as Breck Rec here. The main part of my workout was based around the deadlift today.

    Deadlift Video

    Here’s a video I managed to take of two sets in my deadlift workout today. I did them with my phone and you can see when I knocked my phone over after that first set. If you keep your eyes open you can see it happen.

    That aside, I had a really good workout and I went on to do squats, shoulder presses, and chin-up and pull-up exercises. For the deadlift I did a brief warmup set of 25 @ 45 lb RDL. That’s Romanian Deadlift, otherwise called Reverse Deadlift. I’ll do another article on that soon, but it’s a deadlift in which you don’t break at the knees at the lower portion of the lift. You use your glutes and hamstrings with relatively straight legs. It looks a lot like the ending position in the video, just before I stand up. Again, look for an article with video soon.

    Bar Loaded for Deadlift sets of 1 at 244 lb
    Bar Loaded for Deadlift sets of 1 at 244 lb

    I then did a warmup set of 10 @ 111 lb. These are metric Olympic Bumper Plates so they might not add up like you’re used to. Bumper plates work with a flexible resilient floor, or deck, to absorb the impact of dropped loaded bars. Then I did 8 x 3 @ 199 lb.That’s 8 sets of 3 reps at 199 pounds. Those were intended to be my working sets and then I was planning on being done. I had some fuel in the tank still, so to speak, so I loaded up some more weight and did some singles. That’s sets of 1 rep. I did 5 x 1 @ 244 lb. There’s a lot of reasons to do this. We discussed this at the Steve House seminar I attended. Powerlifters train like this in cycles. It’s recently been recommended that runners train like this. I’m experimenting right now to see how effective it can be for me in my activities.

    Deadlift Technique

    You’ll see in the video that I set up with my feet a little over shoulder width apart and toes pointed outward. That works for me. I have very long legs relative to my height. I can straddle a yardstick. Yep. It makes some leg training annoying, like squats, but I’ve become accustomed to it. So what I’m saying is that if you deadlift, don’t emulate my technique exactly. Find your own foot and let alignment.

    Then I set my hands outside my knees with about a thumb length between my first finger wrapping the bar and the edge of the knurling. Again, this is to clear my knees on the way up. Your position might be different. That being said, powerlifters like to pull the bar up as short a distance as possible, which means a narrower grip. I’m not training for powerlifting, I’m training for uphill travel, so I’m just getting a good workout in. I’m not going to stress over little details. If I ever work my way up to a 1000 lb pull it might make more sense to worry about it though.

    I rock back and forth subtly, maybe you don’t even notice, to take up the slack in my hamstrings and glutes. I straighten my arms and lock my shoulder sockets, and pull. This is a lot of weight and I’m a bit tired now, having done my working sets already. I’m going a bit slower than I like, but near the top as I gain leverage over the bar I snap my glutes to pull my back straight and hold the bar for a second.

    I resist the bar as I lower it, so that I lower it slowly. I’m training the negative or eccentric motion here. The concentric motion is the effort of pulling the bar off the floor. The eccentric motion is resisting gravity as you lower the bar. The eccentric motion is what you use hiking downhill. It’s hard to train for many people, and too much heavy eccentric training in the deadlift or any other exercise can lead to DOMS. That’s Delayed Onset Muscle Soreness, or the pain you feel the day after your workout. For that reason many coaches have their athletes drop the bar as they step away and let the special flooring take the blow. I lower mine to about an inch off the floor before I drop it. That’s the “clang” you hear at the end of each of the two sets in the video.

    Sitting in front of the window taking a break between each set of my deadlift workout
    Sitting in front of the window taking a break between each set of my deadlift workout

    You might notice that I have a tendency to pull my knees out of the path of the bar a bit early. That’s because I have those long legs and when they’re bent it interrupts the path of the bar. Also since I do RDL training with weights in this range of heavy I have a pretty strong glute and lower back area to pull that bar up. Again, your technique might look completely different.

    If you’re not sure how to do this, get some local coaching. Most fitness facilities will have someone who is qualified to teach this to you, or help you get good technique or form that works for you safely. Be sure to subscribe to this blog for more updates, or to get a FREE DOWNLOAD of my “Planning Your Home Cardio” ebook, CLICK HERE.

  • Trail Running Microspikes in Winter

    I normally only wear trail running microspikes, like the Kahtoola Microspikes while doing speed ascents on mountains, like Quandary or Grays, Colorado 14ers. The snow this year has been so soft, and the trails have been so slow, that I tried running in just plain lugged shoes, snowshoes [STORY HERE] and my spiked running shoes [STORY HERE]. A couple weeks ago the Spring Thaw finally arrived and after a couple of good damp snowfalls and a few days of sun the trails became more firm with a good surface for spiked running.

    Trail Running Spiked Running Shoes in Winter

    I was feeling really good on 19 February, so I took off up the trail with a target of something over 2.5 miles. I ended up with 2.6 miles on my spiked Hoka shoes. I was feeling so good that on the way down I did an interval of just cutting loose and came pretty close to a 5:00 pace. That felt awesome. If you love stats check these out, from Strava and Movescount.

    One difference between Strava and Movescount is that Strava doesn’t count standing still in the final calculation, whereas Movescount goes from watch ON to watch OFF. It adds in the dead time when you first start the watch and then when you finally roll in to the bus stop and dig through layers of clothing to turn it off. Not a major deal though.

    It was great to average 12:14 after averaging in the 15:00-17:00 range for the last 8 weeks. Did I mention that the snow had been deep and soft up to now? It was inspiring and I decided that I’d rest up a day then try again with trail running microspikes on over my non-spiked Hoka running shoes. Say what you want, but I do enjoy the recovery speed in these shoes.

    Trail Running Microspikes in Winter

    I went back to the trail then on 21 February after a day of rest and for some odd reason I set my target as a fast 10k trail run on the snow in the trail running microspikes from Kahtoola. Like I said before, I had worn them several times on the mountain trails on my ascents. I just had never tried for a less steep speed run in them.

    Trail running microspikes by Kahtoola on my Hoka One One Stinson EVO shoes
    Trail running microspikes by Kahtoola on my Hoka One One Stinson EVO shoes

    Putting on Trail Running Microspikes – the video

    For fun I decided to share this little video of putting on the trail running microspikes. I’m in a bus shelter near the trail head, just for convenience for shooting the video.

    I got onto the trail and began running. And I just kept on running. And running. It felt good. I enjoyed the traction and the extra few ounces on my feet from the trail running microspikes was almost negligible. I felt like I was going pretty quickly and that inspired me to just keep going to the turn-around point of the run near the bottom of the Santiago Express lift at Keystone Resort. This road is used by the ski patrol and maintenance crew for the Outback area of the ski resort. That’s why the surface texture varies quite a bit. When the snow is soft it’s shin deep snowmobile chop. When the snow is firm and packed it’s the corduroy snowcat tracks. Like that day.

    I felt good at the lifts so I took a chug of water and then took off back down. My goal on the way downhill was to let gravity help me to achieve a smooth even speed at about my maximum endurance level. I hung on hard for the whole downhill and it felt great. I don’t know for sure if the extra traction of the trail running microspikes helped, but I’m very happy with the 6.7 miles I ended up with. At a 12:19 pace. Here are the stats for you that are interested:

    The most fascinating thing to me is that in the 2.6 miles I was in Zone 6 (anaerobic pace zone via Strava) for 1:45. In the 6.7 miles I stayed in that zone for 9:30. Freaking amazing to me. In trail running microspikes in the snow. To go 2.5 times (two and a half times) as far and only lose 4 seconds per mile (12:14 vs. 12:19) proves that something I’m doing in my training is working. Gives me a lot to think about, for sure.

    Trail Running Microspikes by Kahtoola, Hoka running shoes, and UA gloves, drying out after my run
    Trail Running Microspikes by Kahtoola, Hoka running shoes, and UA gloves, drying out after my run

    Trail Running Microspikes in Action – the video

    Here I am holding a camera out away and trying for different angles without breaking my 8:30-ish pace or falling down and breaking me. I love the shadows on the corduroy snow the best. Then the trees blowing by. Enjoy…

    So, how do I feel about the trail running microspikes, now that I’ve had a chance to use them? For one thing I can feel them, even through the thick sole of these shoes. That isn’t necessarily a bad thing. When I picked up the pace I was moving fast enough to ignore them. I loved the traction. The weight is obviously irrelevant. I’m going to experiment with what’s left of the Winter going back and forth between the trail running microspikes and the spiked running shoes to see if I can refine my opinion. If you want to be alerted when I write more articles like this, please subscribe to the blog for updates. Thanks.

  • Losing Weight While Gaining Muscle

    Losing weight while gaining muscle is a topic I hear a lot about. From the people I coach, from other trainers, on message boards and comment threads. It’s a popular topic. A long time ago I went to a seminar for personal trainers. I had lunch with a handful of them and the topic of losing weight while gaining muscle came up among us. One of them was an online and phone remote trainer. There’s nothing wrong with that. I do that now, so I can respect that. He worked for a national chain. When I pointed out the extreme difficulty and unlikelihood of losing weight while gaining muscle, he replied:

    That’s just not true. 100% of our clients lose weight while gaining muscle. Our system works for everyone all the time. You’re just wrong.

    I didn’t bother talking to him after he quoted their marketing materials. I’m sure there’s some weird set of conditions for claiming that grossly exaggerated number. The fact is that it is very difficult. If it were as easy as he claimed everyone would be doing it. You could buy it in a pill bottle labeled “Lose Weight Gain Muscle”. You could read a $.99 ebook and wake up the next morning totally buff and without body fat.


    losing weight while gaining muscle is very difficult - 12% bodyfat
    losing weight while gaining muscle is very difficult – 12% bodyfat

    Are you tough enough for losing weight while gaining muscle?

    Sadly, losing weight while gaining muscle is asking your body to do two completely different things at the exact same time. In general, to gain muscle, you need to train your muscles with a bodybuilding protocol. You will do a moderate volume of training at heavy weights. You will go to failure. Your muscle cells will grow and multiply. With more and bigger muscles you will weigh more. This is simple math with simple proven medical science. Your metabolism will adjust so that you can rest more while muscle growth occurs. Sometimes you will have to eat more. If losing weight while gaining muscle is your goal, the trick is to interrupt the resting process and lose more fat weight than the weight of the muscle you gain. This (lose weight gain muscle) is a fine line to walk metabolically, physically, and psychologically.

    Most people cannot do it. When you set your goal on losing weight, you generally cut your calories down to a really small number and do lots of cardio. You could lose weight for a while, but a lot of that would be muscle weight as well. You won’t be getting enough calories to keep your muscle mass intact. You wouldn’t be stimulating your muscles to preserve themselves with weight and strength training. This is one major failing common to most of the unguided attempts at losing weight.

    Get Guidance Now: Lose Weight Gain Muscle Newsletter [CLICK HERE]

    “A house divided against itself cannot stand.” — Abe Lincoln

    225 pounds of Charles Miske in August 2005
    225 pounds of Charles Miske in August 2005

    When your goal is to lose fat you cut your calories down to a specific level, do cardio at a specific level, and weight train at a specific level. Normally you could train either at high weights and low volume, or low weights and high volume. The idea is to create just enough stimulus to your muscles to preserve them as you lose fat. I recommend that most people start here and work their way up to the body composition they dream of. Turn your dream into a goal with directed action that follows a specific plan.

    Losing weight while gaining muscle: My Experience

    It is possible. I’ve done it a few times. But losing weight while gaining muscle is tough. Dang tough. Without a support system, without logging and journaling, without an accountability partner system in place, without proper goal setting and achievement, I wouldn’t have been able to do it. I was training for Elbrus Race 2010 the first time I successfully put on muscle while losing fat. I was really motivated to suffer, no matter what.

    Your major directing goal should be something that wakes you up in the morning and rolls you out of bed and gets you moving. You should be excited every minute of every day. — from the Steve House seminar in Ouray Colorado

    180 pounds of Charles Miske in November 2011
    180 pounds of Charles Miske in November 2011

    I did it a few other times as I trained for Elbrus Race 2012 and 2013. I’m doing it right now for Elbrus Race 2014. And having been through it a few times now I can honestly say that most people shouldn’t even worry about losing weight while gaining muscle. Most people should lose that fat. Stabilize. Then they can work toward their sports performance goals. Then they can work toward their body composition goals.

    You want to gain the most muscle in the shortest time?

    The way I see it training volume is the amount of work you do in a workout, averaged over time. Work is loosely defined as force x distance in elementary physics. We’ll think of force as the amount of weight or resistance you’re going to generate to move a weight. The good old fashioned iron weights work best for explaining this train of thought. If you lift a 100 pound iron weight 2’ that’s work. The math becomes a bit trickier when you add in pulleys and cables and bands and bent fiberglass wands or fan blades in a cage. You know which machines I mean, right?

    But even if you are using one of those machines you can still use many of these principles to measure your training volume for all practical purposes. My own experience is that I subtly decrease my training volume when confronted with a plateau in my training. My clients have reinforced that opinion over time. It’s surprising how you do it and don’t even notice. — from Weight Training Secret Manual: 8 Hacks to Beat the Plateau

    Don’t fall prey to the plateau! For the optimum goal – lose weight gain muscle – combine the diet plan book below with my new “Weight Training Secret Manual: 8 Hacks to Beat the Plateau” and get on the fast track to muscle growth and strength.

    REGISTER HERE FOR FREE COPY

    You really want to give it your best?

    You really want to try losing weight while gaining muscle. What’s that worth to you in time and effort and ambition and sticking to it with rock solid tenacity? I trained for up to 4 hours a day. Now and then even more. I had partners I shared my training and nutrition journals with. I had 100% support from my family and loved ones.

    How about you?

    Would you train for 2 hours a day 6 days a week and log every single last set and rep and tenth of a mile in your training journal? Would you eat strictly according to simple 5th grade math and sound scientific principles? Would you do that over and over in 6 week cycles until you had achieved your goal? What is that worth $100/mo? $80/mo? $60/mo? What if it were only $10/week to have your

    • Training and nutrition journals analyzed and assessed
    • Your strengths magnified
    • Your weaknesses countered
    • Your success amplified

    Would you sign up for all of that if it meant losing weight while gaining muscle?

    Losing weight while gaining muscle – Diet – the starting point to success

    In my book “The 100 Calorie Diet Plan” I outline some of the steps in this plan. I describe journaling, food portion control, how to determine your actual scientific caloric needs, how to create your own daily menu, how to create your own weight training program. Most of all I explain how to create goals and measure progress. CLICK HERE if you want to know more.


  • Running in MSR Snowshoes

    If you remember my last article about Snowshoe Hiking in Colorado [CLICK HERE] I mentioned that I was using MSR EVO Ascent snowshoes and that I would hardly consider running in them. Here’s the article quote:

    I have a pair of MSR Evo Ascent Snow Shoes, and so long as you’re not trying to run, they’re decent enough for snowshoe hiking.

    Running in MSR Snowshoes - Pace Intervals on STRAVA
    Running in MSR Snowshoes – Pace Intervals on STRAVA

    I decided to give it a try to see how I would do, in spite of that, since I know a few people do run in them. I’ve seen someone running in MSR snowshoes on the Steven’s Gulch Road toward the Grays Peak Trailhead. Trail running has been rough the past several weeks with all the fresh snow we’ve been getting in Summit County Colorado. I’ve been getting slower and slower with each run. The snow has been loose and just sucks your feet in no matter what type of spikes you wear. I did my 10k hike in the snowshoes and my speed was actually right in there with my slower trail runs. So I decided to try running in MSR snowshoes to see what happened.

    Experiment: Running in MSR Snowshoes

    I began with a fairly mild pace, going for about 15:00. That seems slow if you’re used to running pavement at sea level in warm temps. In loose snow trying to figure out the whole snowshoe running thing while going uphill at 5-10% it’s not too bad. After I felt warmed up I set the camera on the tripod and started an interval up and down the road. I was surprised that my watch reported the two back to back intervals at 7:30 and 8:00. I didn’t feel like I was going that fast. Later I checked STRAVA and sure enough it coincided with the watch readout.

    The last time, on my hike in snowshoes, I wore my Salomon 3D Ultra shoes. My feet got pretty sore in a few spots so this time I wore my Hoka One One Stinson EVO for the extra padding. I have an older pair I run in a lot on the snow because I spiked them [SEE ARTICLE]. These are a newer pair with no spikes and only about 50 miles.

    Video: Running in MSR Snowshoes with Non-synchronous Poles

    In this first video I’m using a pole action similar to what I do in my vertical running training. I reach forward, walk up to the pole till approximately even with it, and let it trail to the rear as I set the opposite pole. I might take 2, 3, or 4 steps between pole plants. It’s easy on the arms and I can always push harder or lighter with the poles.

    Video: Running in MSR Snowshoes with Synchronous Poles

    In this video view of running in MSR snowshoes I’m using synchronized pole plants. I’m using them in a short arc jab, one for each foot landing. I found it to be very powerful and fast feeling, even though the interval time was slower at around 7:40, there wasn’t an appreciable difference between the uphill and downhill speeds. That was interesting. I noticed this pattern in the Nordic events in the Sochi2014 Olympics and wondered how I could make use of it in my own training.

    I spent some time in the 12:00 range, which is a little faster than I’ve been doing in spiked running shoes in the loose snow. I was surprised that running in MSR snowshoes wasn’t that bad. I thought that as wide as they were I’d have a weird gorilla gait. It turns out you can slide them right over each other with the edge inside the little groove in the toe of the snowshoe. This allows for a closer foot path while running and helps prevent you from tripping over the other shoe.

    Running in MSR Snowshoes with overlapping grooves shown
    Running in MSR Snowshoes with overlapping grooves shown

    In the photo above, taken during my previous snowshoe hike in my Salomons, I added in red arrows to show the overlapping grooves that allow you to keep your feet closer together while running in MSR snowshoes. I’d love to try other brands to see how they perform, now that I’ve had a taste of this fun winter sport.

    On the flip side, I found that running in MSR snowshoes is a bit noisy. When the flat plastic plate hits the snow at various angles you can hear a definite pop and slap noise. It’s not a major issue, just a minor annoyance that I’m sure you can hear a few times on the videos.

    UPDATE: Found this really good Trail Runner Magazine Article on Snowshoe Running