Author: Charles Miske

  • Stand Up Paddle Board Cross Training

    Stand Up Paddle Board Cross Training

    First of all, let me tell you, my hips hurt. Right where my lower obliques tie into the iliac crest. Yep. And I owe it all to stand up paddle board training. I had a chance to try the Stand Up Paddle Board at Keystone Lake near Mountain House Base Area. I used to canoe a lot when I was in my 20’s. I canoed several hundred miles on rivers and lakes in Wisconsin, Utah, Montana, and Nevada. In the past few years I’ve had the chance to also canoe and kayak on Keystone Lake and when they got a stable of stand up paddle boards I became curious.

    stand up paddle boards all in a row
    stand up paddle boards all in a row

    I have a friend who volunteers in my BSA group who is a river guide, and he said that he uses a stand up paddle board while teaching beginner kayak skills. At a recent BSA week long camp out, we had a lake day, and the life guards were all on stand up paddle boards. So I was really curious now. So I arranged to go try it.

    a beginner stand up paddle board
    a beginner stand up paddle board

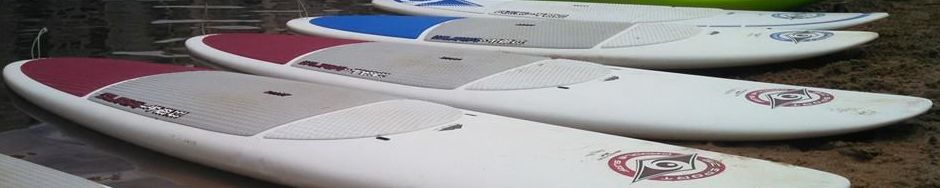
    Stand Up Paddle Board as Training

    I didn’t know there were different stand up paddle boards for different skill levels, but I had to start on a beginner board. It was weird to say the least, but by keeping my knees low and using my hips to drive the paddle with stable shoulders, I was going about 2 + MPH and getting in a good workout. I then switched to an intermediate stand up paddle board. I actually liked it a lot more.

    an intermediate stand up paddle board
    an intermediate stand up paddle board

    That first day I did a little over .8 miles with an average speed around 1.7 MPH. Not too shabby and it felt great on my shoulders, lats, and core. Here’s my Stand Up Paddle Board session from Movescount (Suunto Ambit2 S GPS Heart Rate Monitor – CLICK HERE).

    Movescount Stand Up Paddle Board Statistics Day One
    Movescount Stand Up Paddle Board Statistics Day One

    I went back the next day for another session, I had so much fun. I went back to the intermediate Stand Up Paddle Board and booked it around the lake. I worked on improving my technique and speed and did several laps around the fountains and buoys and got in 1.2 miles.

    Stand Up Paddle Board stats from Strava
    Stand Up Paddle Board stats from Strava

    That’s the view of that workout on Strava, synced from my Suunto. I averaged 2.3 MPH over that 1.2 miles. Much faster than the previous workout.

    Movescount stats for Stand Up Paddle Board workout day two
    Movescount stats for Stand Up Paddle Board workout day two

    Then this morning I had some business meetings to attend and my side hurt quite a bit so I did some mountain bike riding as my cross training instead. The fact that I was hurting proves that I have some weakness there to address. I have to admit though that I’m hooked and will most likely do quite a bit of stand up paddle board training for as long as the lake is open.

    Though I am by no means an expert on this topic, I recommend a low balanced stance keeping light on the balls of your feet. Set the paddle into the water in as straight a line as possible to keep from having to switch from side to side with it so often to stay in a straight line while paddling. Try it, it will make sense in motion.

    Stand Up Paddle Board on Keystone Lake at 9,300' in Colorado
    Stand Up Paddle Board on Keystone Lake at 9,300′ in Colorado

    For cross training, these are the muscles that come into play while ice climbing. The lats and core get quite the endurance training session out of this. If someone does know more about cross training with the stand up paddle board and would like to share, please, message me below.


  • Stair Climbing for Mountaineering Fitness

    Stair Climbing for Mountaineering Fitness – the Video

    Stair Climbing is a great way to train for mountaineering fitness if you don’t have access to an incline treadmill or Stairmaster Stepmill. If you are creative in locating a set of steps you can try stair climbing as your own way to get in your vertical feet per week goals as spelled out in my “Mountaineering Fitness: Beginner Training Manual” available soon in Paperback and Amazon Kindle. PROGRAM HERE

    [youtube https://youtu.be/pDA8HG6LUlQ&w=640&h=360&rel=0]

    Stair climbing also has the added benefit of providing negative, or eccentric contractions just like in a real hiking environment. Stepmills and treadmills do not help train your muscles that provide balance, stabilization and deceleration for your downhill hiking. Stair climbing does since you have to go down any staircase you go up. You would be hard pressed to find a stairway over a hundred feet high, so getting in a thousand feet of vertical will require that you do laps when stair climbing.

    You will also need to allow for the downward steps when calculating your time. I have found for myself that I go about twice as fast on the way down. In the video I did a test with a stopwatch to find that I was doing a little under :30 (thirty seconds) per lap. With 54 laps required that comes out to around 25 minutes of stair climbing to get in my target vertical.

    A few things to be aware of though for stair climbing:

    1. Be sure to be very careful and under control on the way down
    2. Keep your back in a good neutral arch which can be more difficult on the way up
    3. If you’re on slippery wet stairs be a lot more careful, or on metal stairs with some shoes
    4. Use the handrail if needed until you get your balance and strength up to par

    From my Youtube Channel: 

    In the Mountaineering Fitness: Beginner Training Manual I go into great depth on training on stairs to get in your weekly vertical. I explain the math used to calculate your weekly vertical goals and how to use warm-up and cool-down walking to get in your weekly mileage goals.

    In this case there are 21 steps 8″ average height for a total of 54 laps required to get in the target 750′ of vertical (based on 3,000′ of weekly vertical and 4 training sessions). I measured 24 seconds on an average lap without really rushing it, so expect the entire workout to take about 25 minutes on the stairs.

    Production Note: For this video my microphone picked up all the noises from a road a few hundred yards away and a crow that was annoyed by my presence on his stairs. Unfortunately the noise reduction was minimally effective. Normally I would do ADR recording but I wasn’t on my studio PC, so I apologize for those few things that were more difficult to understand.

    Stair Climbing for Mountaineering Fitness early morning training session
    Stair Climbing for Mountaineering Fitness early morning training session

  • Reverse Hyper Core Training

    Reverse Hyper is the name often given for the opposite of the Back Hyperextension. In the latter you stand in the foot pads with your heels held firmly in place. Then leaning the quads or the upper part of the front of your legs on pads you lean forward hinging at the hip toward the floor. You go down to approximately 45 to 60 degrees and then rise up to parallel or more above the ground.

    Reverse Hyper on the bench named for the exercise
    Reverse Hyper on the bench named for the exercise

    With the Reverse Hyper you can use the special bench shown. You place your chest and torso on the bench with your hips extended out over the edge. Then you grasp the handles and hold yourself steady while hinging at the hip joint to lift your legs to above parallel to the floor. You then lower your legs under control to perpendicular below you.

    In the video demonstration I’m doing sets of 12 with no additional weight. I’m lifting my heels up fairly high with a good degree of flexibility and mobility in my lower back.

    Disclaimer: Obviously this might differ between individuals and is best determined by your own self-awareness or the advice of a qualified professional familiar with this movement and the requirements to perform it safely. Be careful and don’t become injured.

    Reverse Hyper Video Demonstration:

    httpv://www.youtube.com/watch?v=w8xyR6i97ho

    This type of reverse hyper bench has a swing arm that you can slip around your ankles to add weight. The lever arm itself adds in about 5 pounds or so of resistance but it takes a little getting used to. If you want to add weight perhaps just using the empty lever tubing would be a good way to start to see if you like it or not.

    I think you could also add ankle weights when you do the reverse hyper. For an exercise like this that I consider an accessory movement I prefer 3-6 sets of 12 with no or little weight added. An accessory movement supports another more primary movement, such as the RDL. Otherwise known as the Romanian Dead Lift this is itself an accessory movement for Squats and Deadlifts.

    I’ve seen demos of the reverse hyper holding a dumbbell in between the toes of the feet, but I think this would be too dangerous for most normal people and recommend against it.

    The “Superman Plank”, a bodyweight, no bench version of this, is one of the main core exercises in my Mountaineering Fitness: Beginner Training Manual INFO HERE

  • Hanging Knee Raises

    Hanging Knee Raises are among my favorite core training exercises. I like to use the arm straps that connect to a power rack, or pull-up bar (or some other way to connect them).

    Slip your arms into the straps until your elbows poke out the end and if your shoulder and elbow mobility allow, reach up and gently hang onto the large snap rings (carabiners) that you use to connect them to the rod). From there lift yourself up with your lats and abs until you’re hanging straight down from the straps.

    Starting position for hanging knee raises with your elbows just coming out of the straps and hanging onto the carabiners loosely.
    Starting position for hanging knee raises with your elbows just coming out of the straps and hanging onto the carabiners loosely.

    For strict hanging knee raises you’ll need to avoid using momentum to accomplish the movement. Use your core to pull your knees up as high as you can without hurting your back. If you can gently tap your elbows with your knees, all the better. Again, without momentum, finish each rep of your hanging knee raises by lowering your legs and straighten them as you go down. Try to not touch the floor with your feet and try not to let your feet swing behind you. This will add momentum as you go forward and reduces the strictness of your hanging knee raises. Use tension in your core to slow the motion of the hanging knee raises at the bottom so that your feet stop just under you.

    Upper position of the hanging knee raises with your knees touching the tips of your elbows using tension to pause to prevent the assistance of momentum.
    Upper position of the hanging knee raises with your knees touching the tips of your elbows using tension to pause to prevent the assistance of momentum.

    When you do these correctly and with proper tension in your core, you should only be able to do a dozen, give or take. If you can do a lot of hanging knee raises, you’re using momentum to assist the motion. This isn’t necessarily bad, since momentum and dynamic motion are valid means of training hanging knee raises, but you should mix it up and use them without momentum on a regular basis for best benefit to your core.

    I recommend doing 5 sets of 10 to 12 hanging knee raises without momentum with every other workout session.

    Hanging Knee Raises Video on Youtube:

    httpv://www.youtube.com/watch?v=L6-CXiwoYVs

    Disclaimer: If you have shoulder, elbow, wrist, or lower back mobility issues (or any other type of issue) that could result in pain or damage, either stop doing hanging knee raises or find a variation that you can safely do. If you don’t have commercially available straps and a safe place to fasten them, please find training or information for another variation.

    Be sure to look for my upcoming Mountaineering Fitness: Beginner Training ManualDETAILS

  • Food, Water, Emergency Gear for Hiking

    I just put up a YouTube video based on my recent book:

    Mountaineering Fitness: Beginner Training Manual

    If you want more information on how to get the book or subscribe to the monthly training program [CLICK HERE] and let’s get training together for the mountain of your dreams.

    This video shows some of my recommendations about 

    • Snacks
    • Water bottles
    • Purificup Water Purification [CLICK HERE]
    • Goal Zero Battery Pack [CLICK HERE]
    • First Aid
    • Headlamp
    • And More…

    Check out the video and leave comments if you agree or disagree with any of my own recommendations and preferences. Thanks!

    httpv://www.youtube.com/watch?v=AgxXbKQtgIU

    • Training Program Subscription Offer ends June 27 2014.
    • Training Manual publishing August 2014
  • Shoes, Boots and Socks for Hiking and Mountaineering

    I’d like to share my own recommendations for footwear for hiking, mountaineering and training from my current training program:

    Mountaineering Fitness: Beginner Training Manual

    If you’d like more info, please check out the page HERE to subscribe to the blog or the program.

    httpv://www.youtube.com/watch?v=VFim2gFp-N4

    If you’d like to subscribe now, you can do it below or from the CharlesMiske.com page linked above. It’s $30 for 16 weeks of training and includes the eBook text of the training manual, as well as 16 full weeks of training to get you to the top of your mountain this Summer. The form below will reveal the Buy Now button, so submit it and don’t reload the page. Thanks.

    Sorry, offer expired for 2014