Blog

  • Trail Running in Winter at Keystone

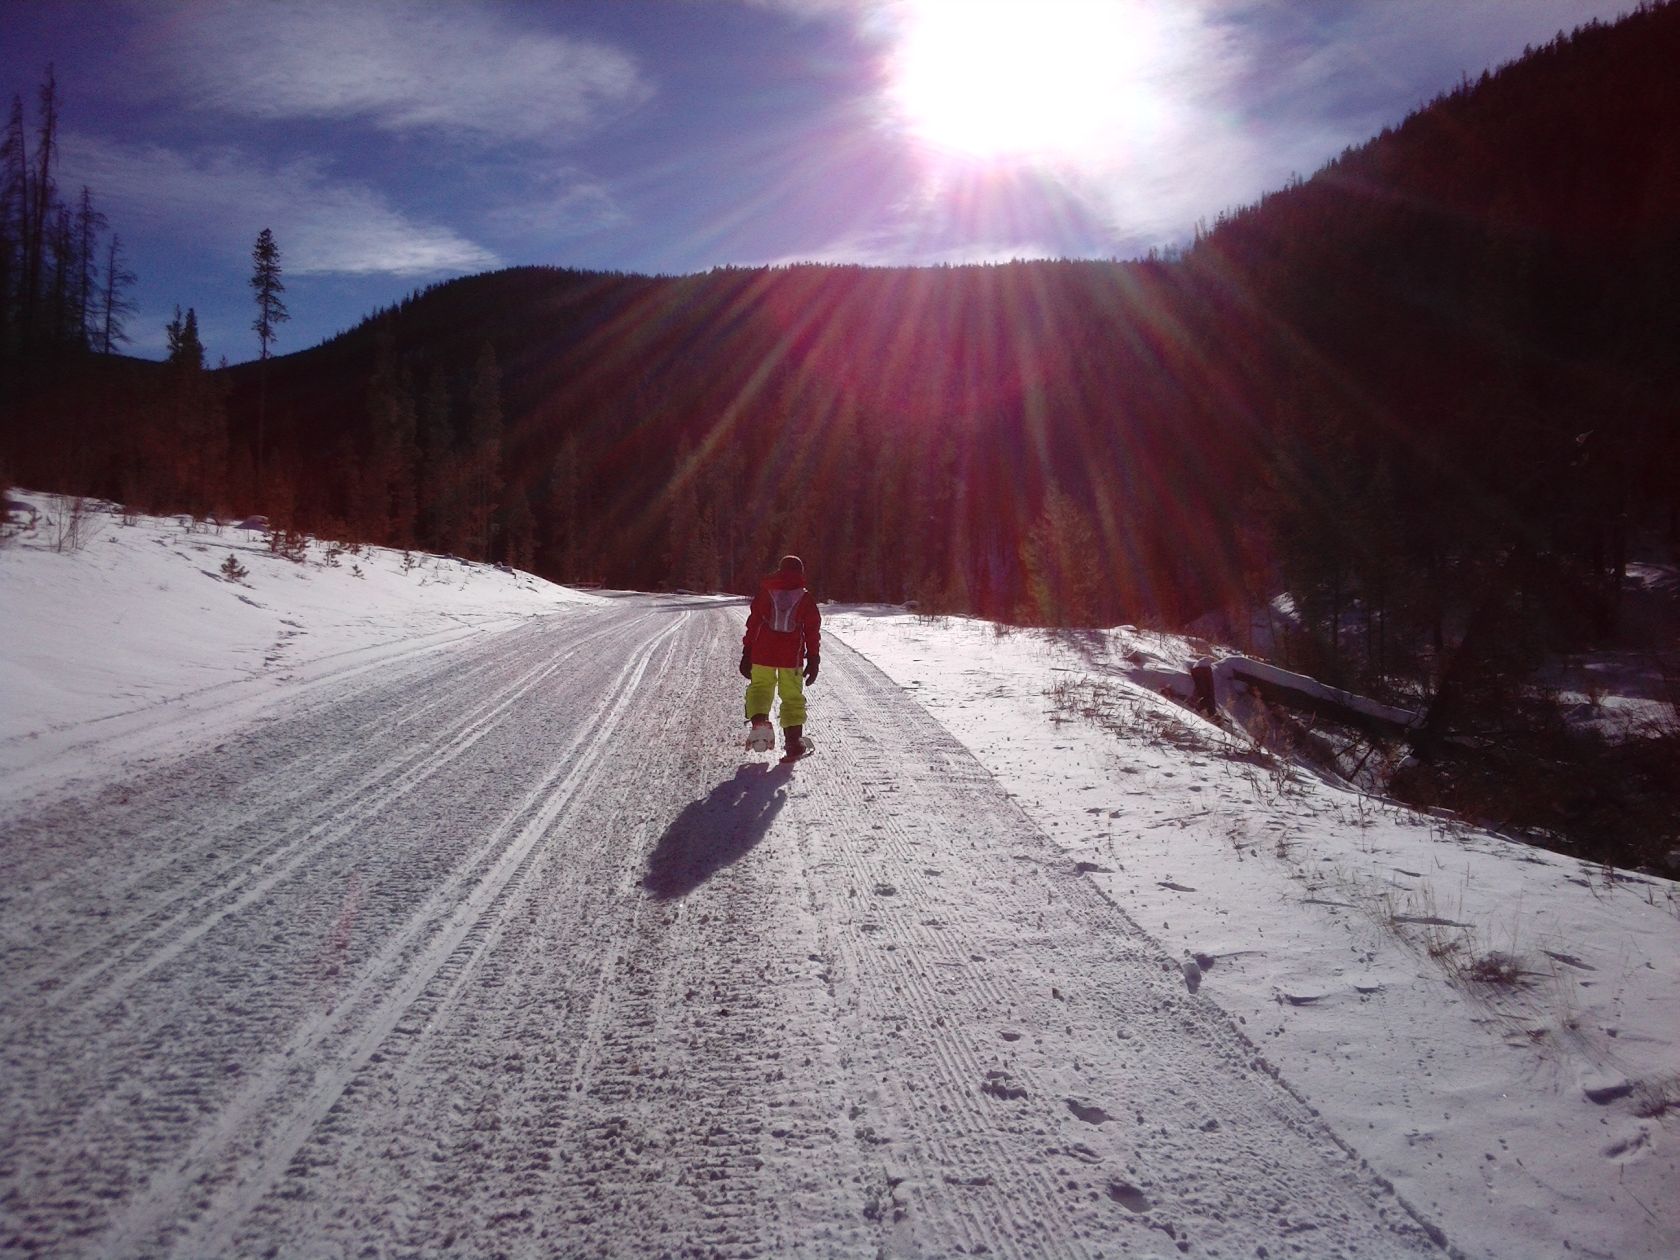
    Trail running in the winter can be exhilarating and quite an adventure. It’s one of my favorite activities. I love to run in the Winter in Keystone Colorado at 9300′ or more in elevation. One of my favorite trails to run on is the Keystone Gulch Road. This is the access for snowcats and snowmobiles to the back lifts of Keystone Resort. Normally the road is packed down by the constant daily snowmobile traffic, so it’s easy enough to run in spiked shoes. I had done Gray’s Peak with a friend on Saturday December 29 on a very cold day. My Polar Graph showed that I should have about five days of rest. Today, January 1 was a whole new year, right? I decided a mild bout of winter trail running should be fine.

    Trail Running in Winter clothing and gear
    Trail Running Winter Clothes and Gear

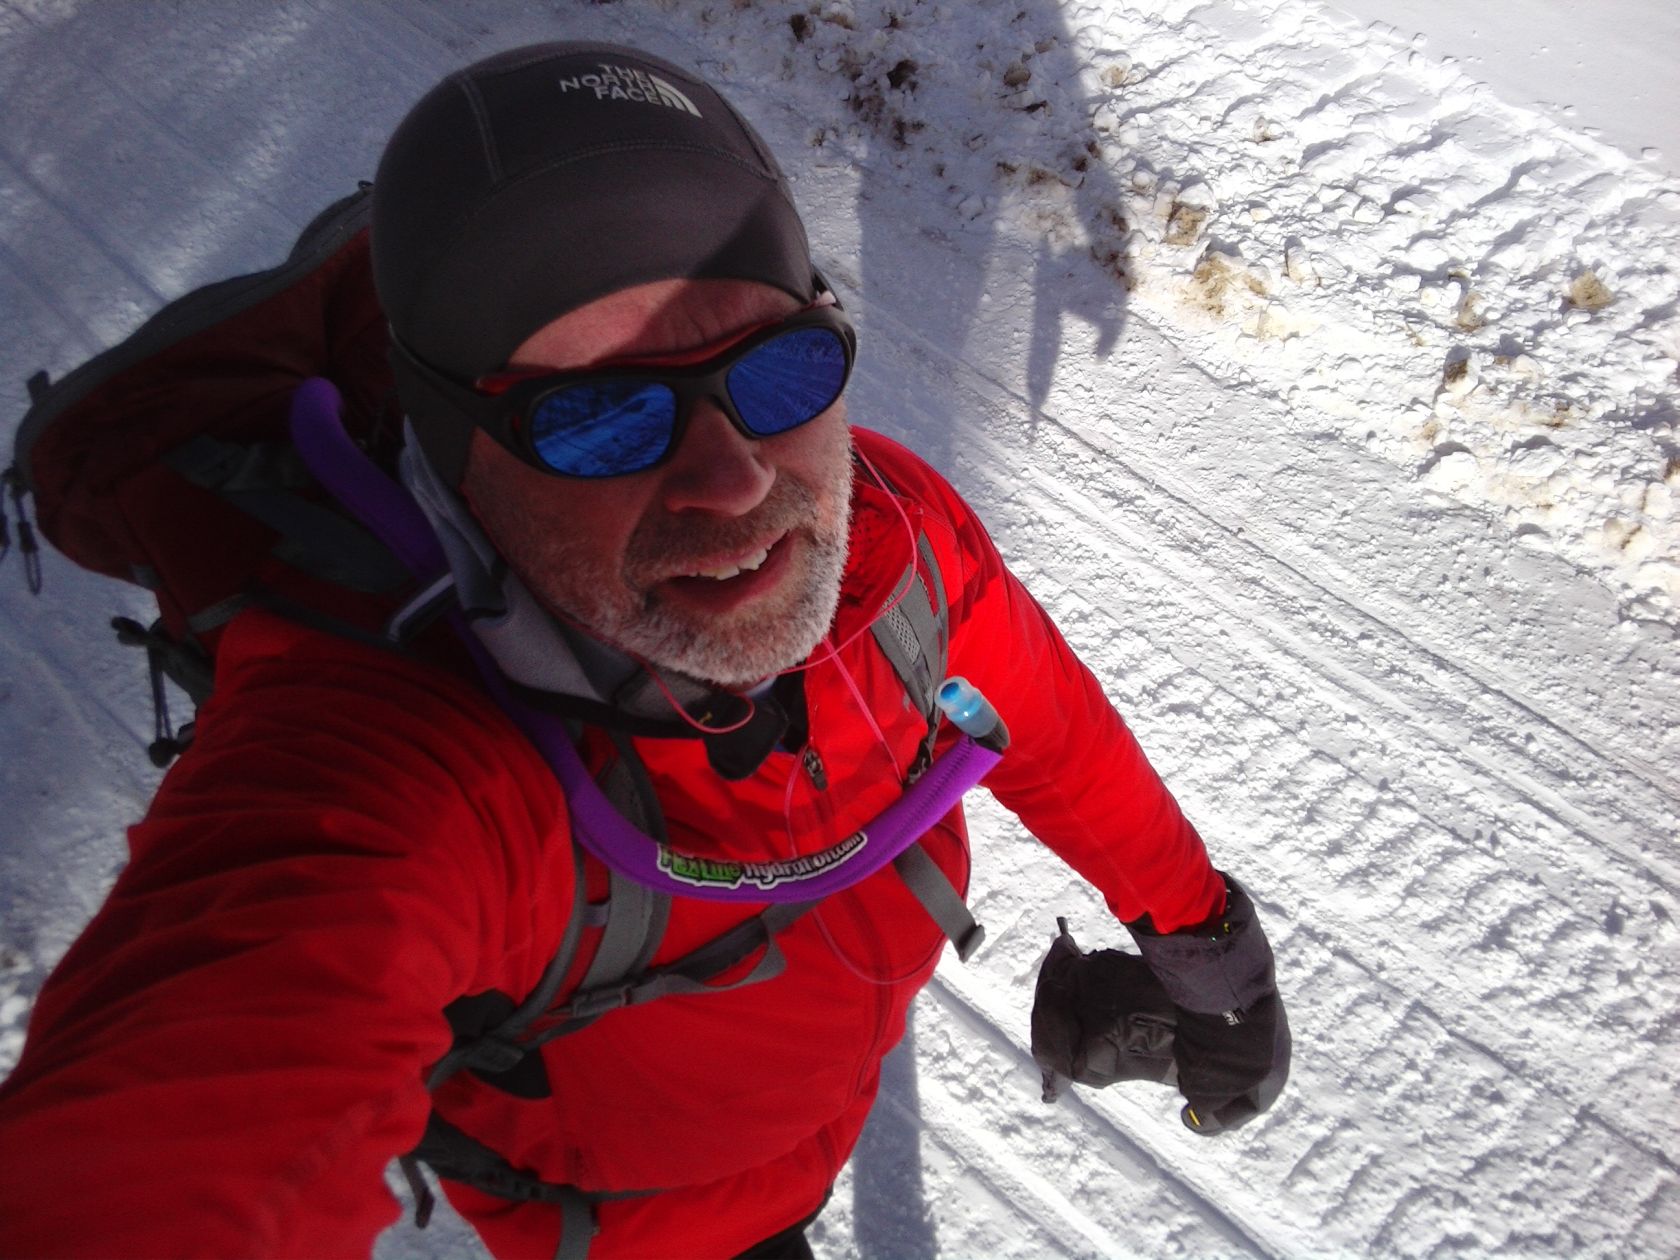
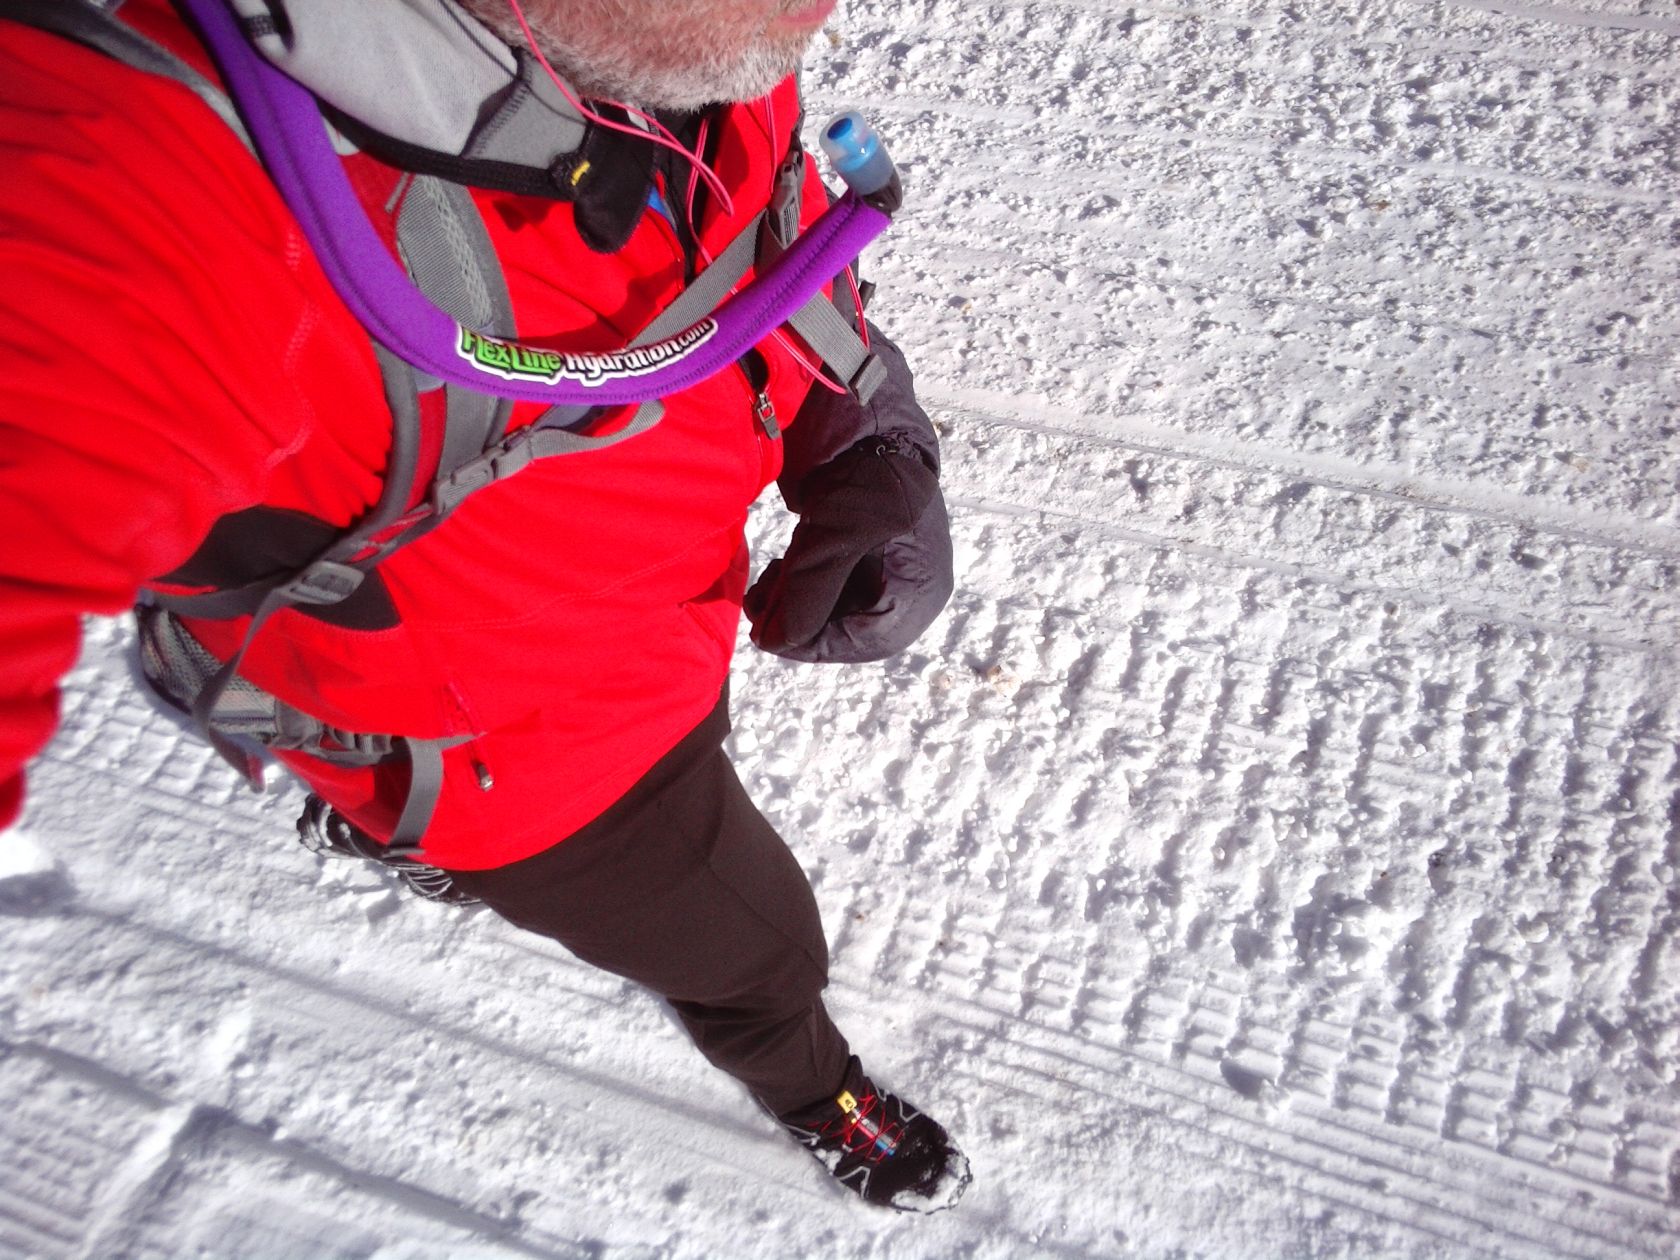
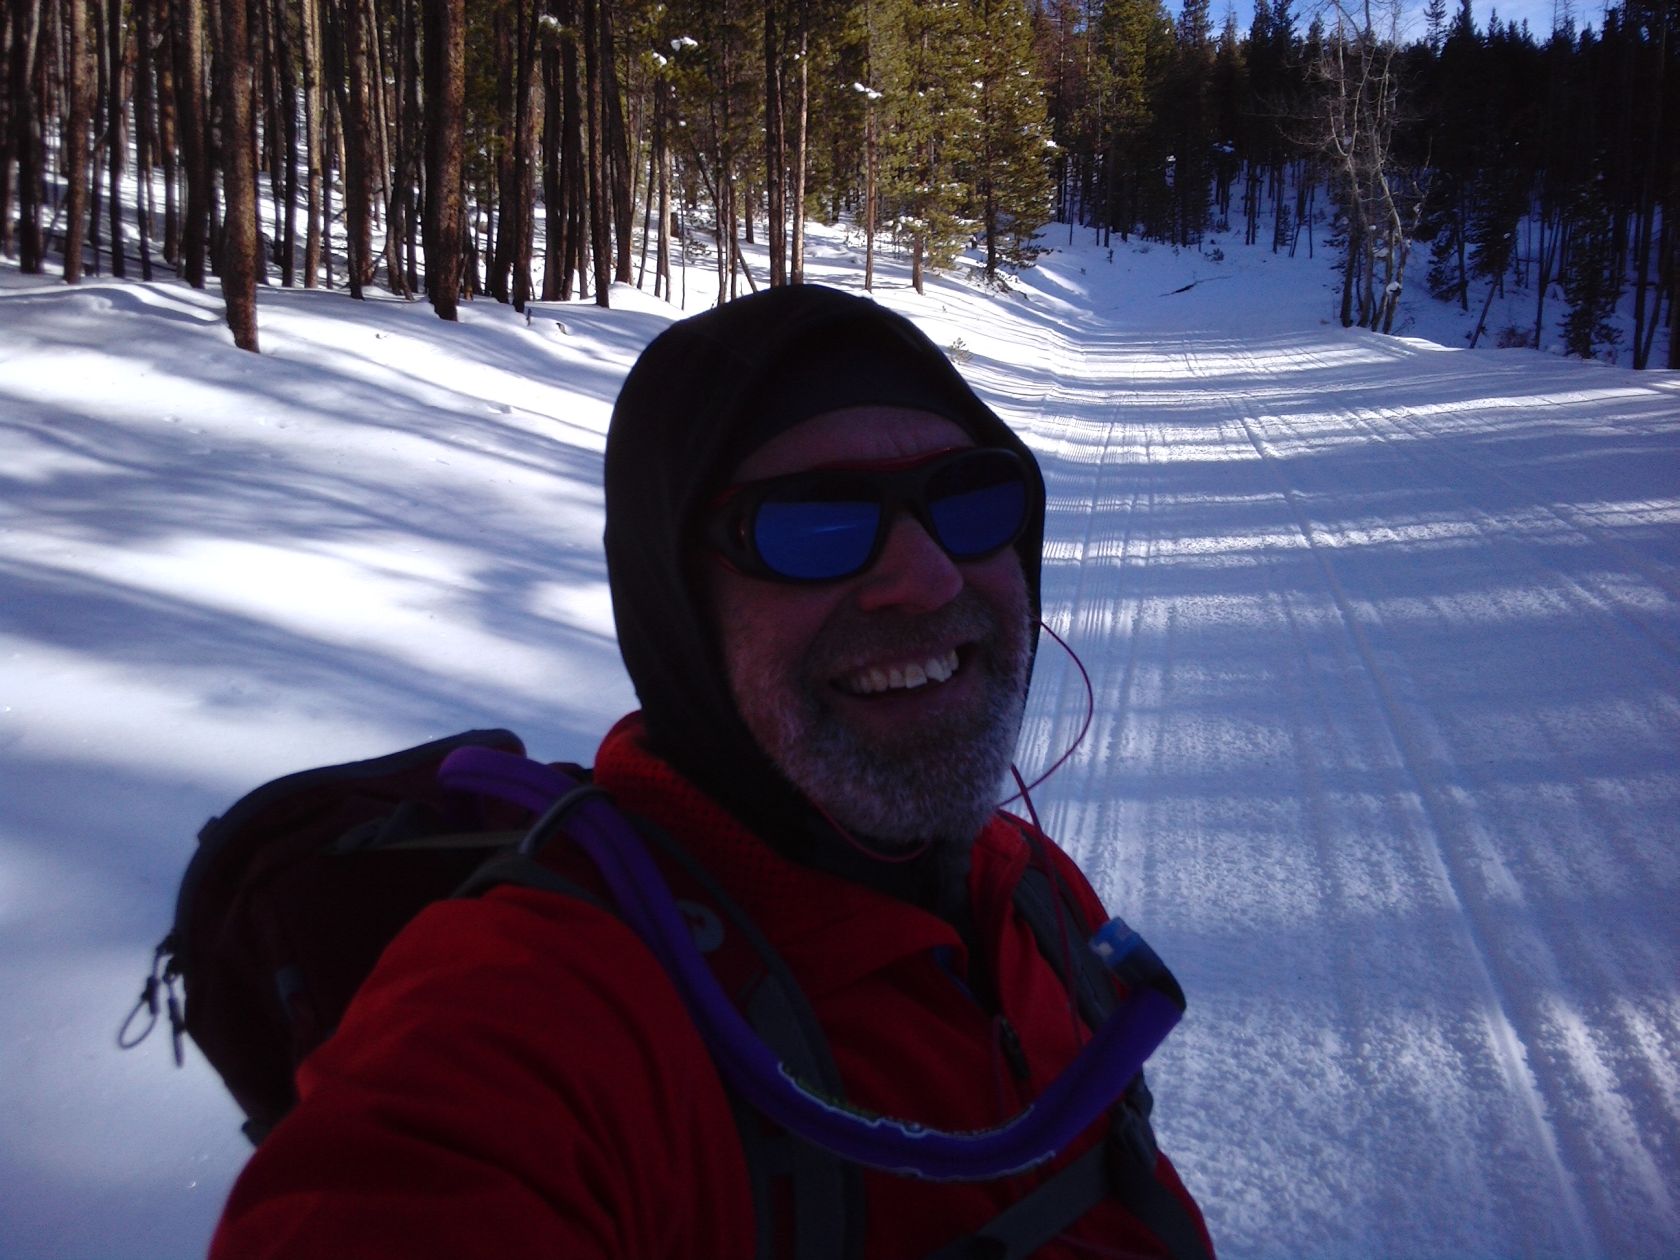
    Trail running this winter morning would be probably the coldest I’ve done. When I started it was zero degrees Fahrenheit out. That’s cold. I’ve run at 5 degrees before. I’ve done the 14ers at below zero. Then you’re moving a lot slower and can wear and carry more emergency gear. I decided on my new Sporthill pants, which did pretty good at 5 degrees the other day. I decided against base layers. I wore a Patagonia fleece hoodie as my next-to-skin layer. Experimenting. I wore a thin waffled fleece over that, then a thin wind shell with breathable panels. I wore my classic favorite TNF running beanie on my head. I’ve grown to like my Injinji liners and Smartwool Men’s PhD Mountaineer Crewsocks as cold weather running footwear. For my hands I decided to experiment with my Burton touch-screen liners under my REI Winter Biking Lobster gloves.

    Trail Running on Keystone Gulch Road

    Trail Running in the Cold behind Keystone Resort
    Trail Running in the Cold behind Keystone Resort

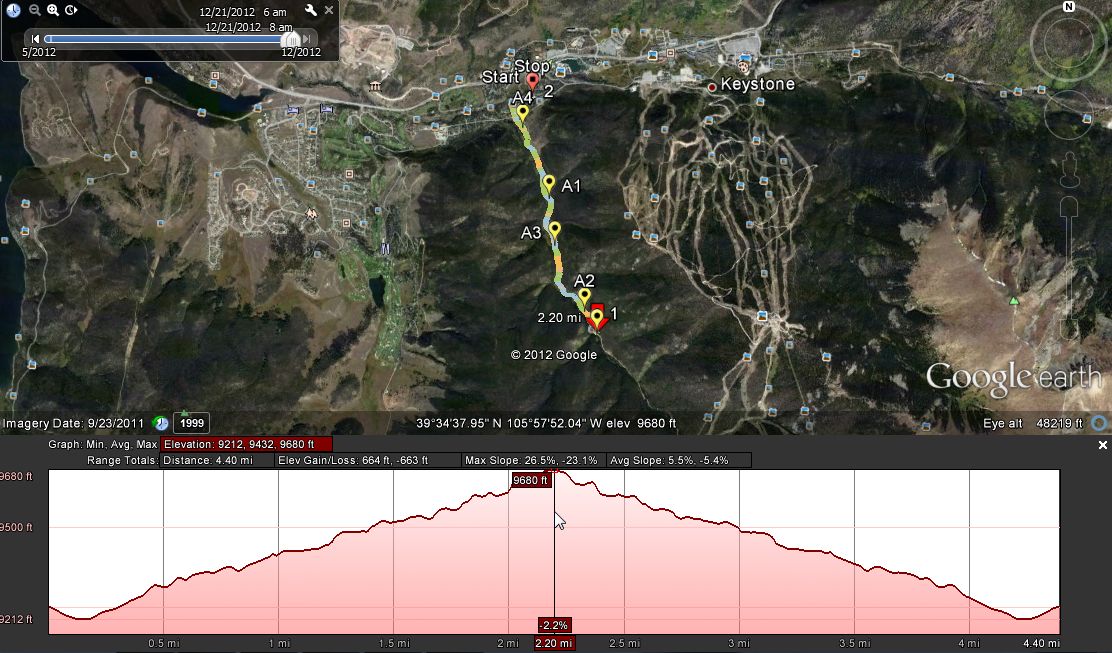
    I started my HRM/GPS watch in a parking lot near the entrance to Keystone Gulch Road. The road can be pretty bumpy and has space for only a few cars. Warning: park at your own risk wherever you decide to park since most of this is resort property. I walked quickly up the road swinging my trekking poles, Black Diamond Compactor Ski Poles. Today my goal is to run/walk intervals working on improving my turnover rate (foot strike speed) by making smaller faster steps. I also am going to work on syncing my pole swing with my steps to increase the number of steps per pole swing.

    At the gate, just up the road a short bit, I tapped my lap counter and took off running slowly uphill. I worked my way up the Gulch Road with what I interpreted as fairly even run/walk intervals. After a while I decided to do some trail running hill repeats on a particularly pleasant grade. Usually you run up and walk down, or walk up and run down, depending on your training goals. Today I’m running down, quick turnaround then up. I paused at the top for a minute to catch my breath, then repeated it.

    Trail Running Hill Repeats in Winter with Poles: Video

    When I was done I gathered up my camera and took off trail running in the snow uphill again. The sun was pretty, and the wind was light. Bright flashing crystals of snow blew off the pine trees. I kept up the run/walk intervals for about an hour of total time.

    Trail running in winter along the Keystone Resort back side
    Making snow at Keystone Resort on North Peak

    I had hoped to get to the base of North Peak, near the LaBonte’s Cabin area. I’ve been there a few times for trail running on this road. It’s about three miles from the gate. Today my face was getting really cold and I decided three miles from the parking lot was a good enough turnaround point. I was using my backpack for training and to carry water. I was using my Flexline Hydration system with a Platypus Bladder inside the insulated sleeve of my Marmot Kompressor backpack. I also have my GoLite Bitterroot down jacket for just in case. Smart when it’s at zero degrees.

    winter trail running on the snowcat tracks at keystone
    View looking down on myself and the snowcat tracks I ran on

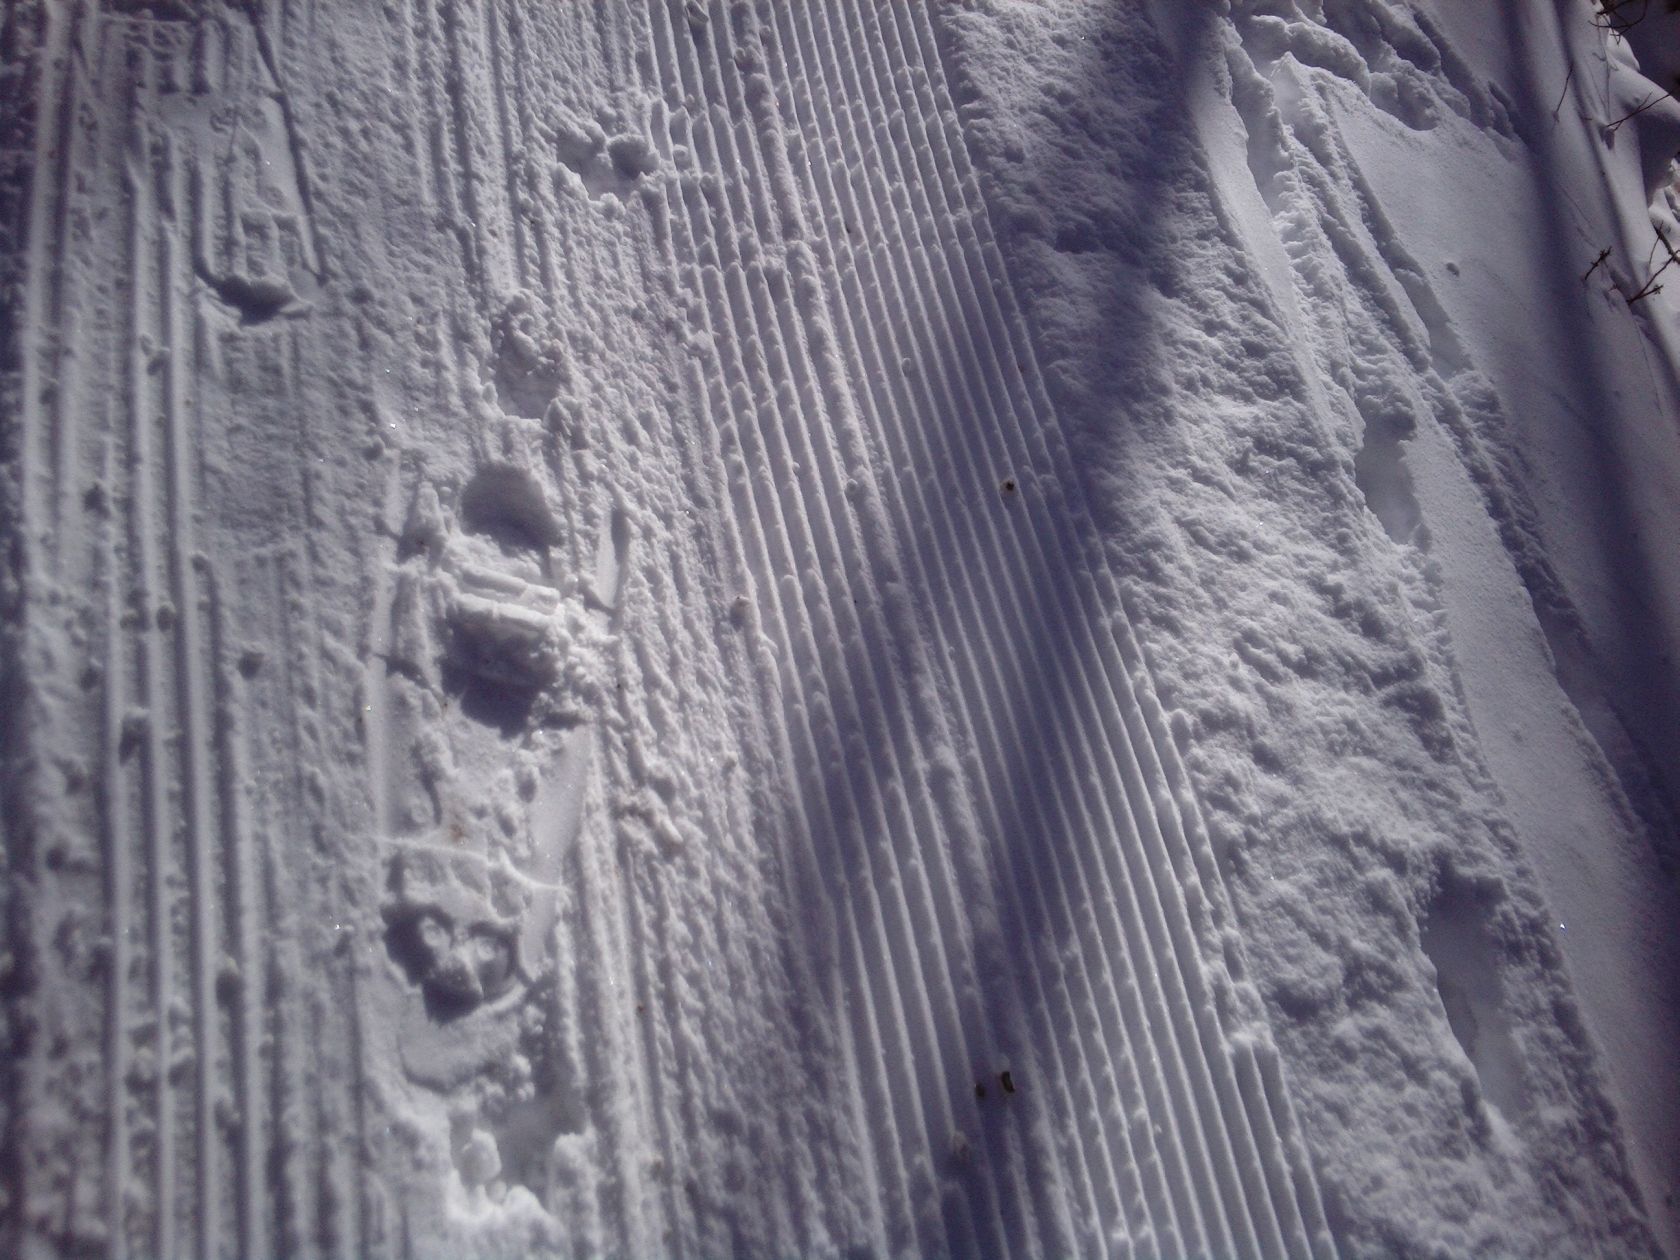
    On the way downhill I worked to stay around an 11:00 minute mile pace. The footing was rough, between the tracks of a snowcat and multiple snowmobiles passing up and down the road all day. It varied with ice chunks, chopped snow, ice sheets, and narrow gullies between the paths. I can sustain an 8:20 pace on nice dirt trails, but chunky snow is totally a different trail running surface. I had to take a couple of walking intervals but tried to keep them short, drinking from the Flexline tube at each one to stay hydrated. Since the whole run would be less than two hours it wasn’t worth eating. YMMV. Remember that one key to success in using a bladder system at this cold a temperature is to totally blow all the water out of your tube between each drinking session. Short frequent drinks are better than longer drinks at longer intervals. If ice does start to build up you will suck it out of the tube more often and keep it clear with more frequent drinking.

    One of my favorite trail running roads at Keystone Resort
    Looking down the road at Keystone Gulch behind Keystone Resort

    As I got further and further along I had to take more frequent and longer walking breaks. I finally got to the gate and hit my lap counter again to mark it. I ran quite fast down the road, crossing the street carefully, then walked to cool down to the parking lot. My face felt pretty windburned, and when I got home my nose hurt quite a bit when it thawed out. I recommend sealing your nostril skin surface with chapstick when you go out in this level of cold. I will do that next time for sure.

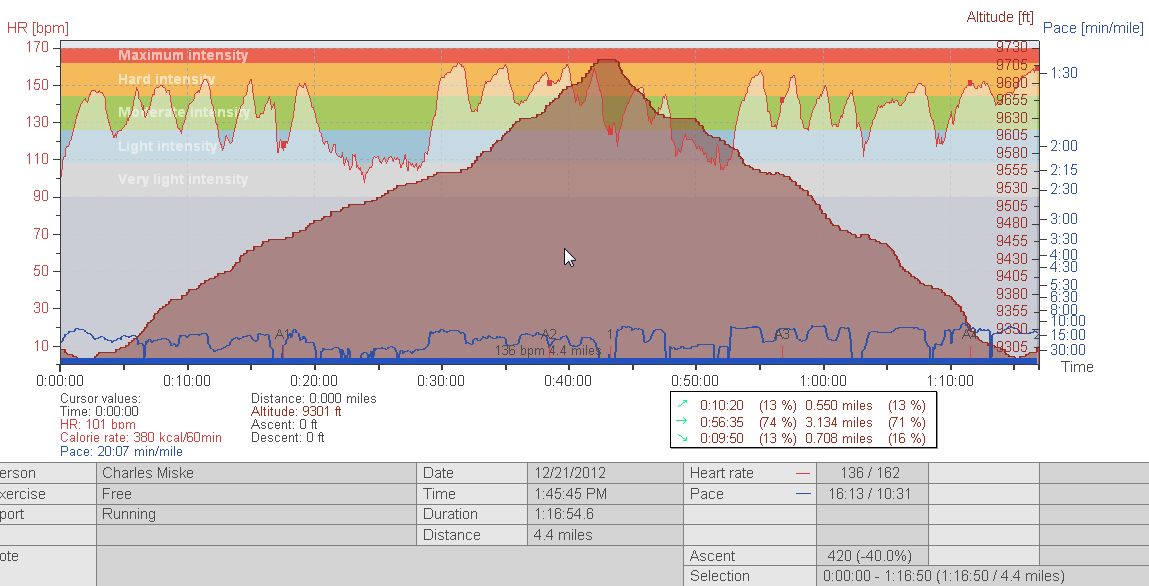
    Winter Trail Running: My Stats

    I checked the stats on my Polar RS800CX and found that I had spaced out my intervals pretty decently. I had maintained a good pace, especially on the way downhill. I also looked at my heart rate zones and found a good spread, pretty full in the upper middle, where I want it right now. It was a good way to train my last day in Colorado for this trip.

    trail running polar graph with elevation, heart rate, and pace
    My Polar Graph with elevation, heart rate, and pace from my trail running adventure

    If you decide to try trail running in the Winter, I highly recommend you break into it slowly. If you’ve never run outside before, or on uneven surfaces, it might not be a good idea. It’s going to be cold, and if it’s windy, miserable for most people. Wear the appropriate clothing, and try to avoid sweating if you can. It’s best to be slightly cool rather than slightly hot.

    Winter Trail Running heart rate distribution graph courtesy of Polar
    Polar heart rate zone distribution for this winter trail running adventure

    Above all, stay safe, stay warm, and remember that trail running below freezing can be fun 🙂

  • Fat Loss with New Years Resolutions

    Got Fat Loss?

    Like much of the civilized world right now you want to know about fat loss. It’s the very edge of 2013. You are probably thinking up some new years resolutions. If you’re like most people, you also are making the wrong resolutions. Or your resolutions are poorly formed. Here are some ideas to help you make better resolutions.

    Reward your fat loss goals with treats if that works
    Mt. Fuji in Japan with my wife. I had lost nearly 20 lb at this point in my fat loss journey.

    Resolution:
    1. The state or quality of being resolute; firm determination.
    2. A resolving to do something.
    3. A course of action determined or decided on.
    thefreedictionary.com

    The definition of “resolution” implies a firm determination and decision. Many people tend to think of it in black/white terms. Either/Or. Fat Loss or … Fat Gain? That’s the catch here. If it’s total opposites, the only failure option available is to gain fat. Don’t get stuck in that trap.

    Group activities with a deadline make great fat loss goals
    American Fork Canyon Half Marathon 2011 finish line

    Let’s begin by thinking of a Resolution as a Goal. A goal is a target. You either hit it or miss it. That simple. First of all a goal should be easily defined. Easily written down. Studies have been cited that people who write down a goal are more likely to achieve success than those that do not. Even if they never ever read that goal again. If they read that goal over and over and over they are even more likely to succeed. Your fat loss goal deserves the best chance of success. Write it down.

    Fat Loss Goal? Write it down

    for best success in your fat loss goals build a support team of family and friends
    My kids at the Steamboat Half Marathon. Get the kids involved in your family fitness adventures.

    Your goal has to be measurable, controllable, and achievable, with a starting point and an ending point. It must be a statement of fact as though it were true. Not a wish. Not a desire. Not a want.

    I want to be a size 6. That’s not a goal. That’s a dream.

    I am a size 8. I will be a size 6 in 10 weeks with carefully controlled nutrition and exercise. Now that’s a goal. It’s defined. It points to the process. It has a starting and ending point. It’s achievable in the time given for many people. It’s even measurable.

    Measure your fat loss goals and succeed

    track your fat loss goals with apps and software
    Tracking software or apps can help you achieve your fat loss goals

    There are at least a few ways to track your goal achievement. One way is to set a group of subgoals. Break down your fat loss milestones into smaller and smaller parts. It’s easier to do a little thing several times a day and see if it works than to do one thing every six months or so and just not know. I have a screenshot above from my PolarPersonalTrainer.com Web App. It syncs with my Polar FT60 Heart Rate Monitor Watch that I wear for most workouts. I can track to be sure I’m not coasting in my workouts. I can also see if I might be overtraining. I highly recommend one of the many different heart rate and fitness tracking apps.

    Some people can handle daily or weekly weight checks. Others can’t. For body composition goals I don’t recommend weight-based goal numbers. As you work out your muscles might grow a bit, and muscles weigh more than fat. They also can store water better than fat. Your intestinal contents, what you eat on a daily basis, can also hold varying amounts of water. Weight isn’t always the best way to measure fat loss.

    You an get a bodyfat percentage measurement on a regular basis from health departments, fitness facilities, trainers, and several others. It’s a good way to measure your fat loss, and in general it adjusts itself to the amount of muscle you have. You can also just go by how your clothes feel. Count the empty holes in your belt. When your pants fall off. Clothing sizes can vary quite a bit from the different manufacturers. One company can have you at a size 32″ pants and another at a size 36″ pants.

    body composition improvement evident in fat loss
    Upper back development at 12% bodyfat

    You can also track yourself with a diary or journal. Keep track of your daily accomplishments. Keep track of every single food item that goes into your mouth. Weigh it, measure it, note it. Keep track of how you feel when you wake, when you train, in the evening. Keep track of every ounce of weight you lift or push or pull. Keep track of every minute you do cardio of any type. Look back on previous results to compare and establish progress. You can eliminate a lot of fat loss excuses this way.

    Reward your fat loss goal accomplishments

    Some diet plans include cheat days. I’ve seen some pretty good math to show how you can totally sabotage your entire fat loss nutrition plan in a single meal. Just avoid it. After a while, if you think about it, it just seems desperate. Instead find things that you love to do. Things with your family. Things you love to wear. Things you consider luxurious otherwise. Go ahead and reward yourself. Just not with food. It’s like rewarding a thief for not stealing things for a year by allowing them free reign in a jewelry store.

    One of my favorite rewards is a hike in the mountains with my family. I like to try a running event, like a half marathon in beautiful canyons. I know people who like to buy a clothing one size too small and work their way into a perfect fit. Do what works for you. Just don’t use food as your reward for fat loss success.

    fat loss nutrition is healthy eating
    Fat loss nutrition, not diet, will be key to your success

    Take Fat Loss Goal Setting to the next level

    When you first start setting goals, they should be easy enough you can hardly fail. Set microgoals that are easy and well defined and well measured. Here’s an example of one of these daily sets of microgoals.

    Today I will wake at 5:00 AM, take my vitamins with a large glass of water. I will do 10:00 minutes on an elliptical at Level 4 as a warmup. I will do full Back Squats with 135 lb for 30 total reps in 15 minutes. I will do Leg Extensions with 60 lb for 50 total reps in 15 minutes. I will get on a treadmill and do 30:00 minutes at 6.0 mph and 3% incline. I will eat a high-protein, moderate carb, moderate fat meal. I will take a very hot shower and get ready for work.

    Each of these little microgoals are an element of this daily goal. Each of these little chunks of action are simple enough to do, one after the other, to achieve this part of a larger fat loss goal. Aside from the weights and reps involved, which could easily be adjusted for anyone, these microgoals would be very difficult to fail at. When you first start, you need lots of success. As you become an expert at setting goals, you can make more and more advanced goals, with a higher probability of failure and it will not deter you from keeping on the path you set out on in the first place.

    fat loss makes your muscles stand out more
    Leg Muscles appear more obvious when your skin is thinner from fat loss

    Fat Loss Goal Failure?

    Yes. Sometimes it happens. You fail. Say that for some reason or other at the end of the 10 weeks you’re not a size 6. Now what? For one thing, if you’ve been keeping accurate measurements and a diary or journal, you probably would have noticed this a while ago and made some microgoal corrections. For myself I have recently had an issue that when I looked back on training journals from two years ago suddenly made sense and I was able to address it and possibly avoid a year of setbacks. Refer to your journals frequently.

    You can also evaluate your goal and see if it was realistic. For some people 3 pounds of fat loss a week is possible. For others that might take six weeks. You find out what you can do or get away with by evaluating your failures.

    “I have not failed. I’ve just found 10,000 ways that won’t work.” — Thomas Edison

    I think people probably need to fail to figure out their own success. Don’t let it get to you. Re-evaluate. Set a new goal based on your failure. At 185 lb and over 50 years of age I will never run a 4:00 minute mile. It would be silly to set a goal based on that. I will never have a 28″ waist. I will never do a triple-axel. But that doesn’t detract from any goals I set, so long as I avoid those exact goals. I can set a goal based on a 7:00 mile. I can set a goal based on a 32″ waist. I can set a goal based on a waltz jump combo. Find what you can do and focus on that. Not on what you can’t do.

    Trail running is an excellent activity for fat loss
    Top of Mount Olympus outside Salt Lake City Utah, a favorite trail run

    I want you to explore the full range of setting goals and making achievements in your own fat loss program. This article is just the tip of the iceberg when it comes to learning to set goals. If you can, read books on goals. Listen to audio books on goals. If you can afford it, hire a trainer who has success with goals. Hire a life coach. You can get quite inexpensive online and phone life coaching. Some people are strong enough to do it on their own, some need help. If you want success, do what works for you. It’s your future. What’s it worth?

  • Winter Trail Running in Colorado

    Winter Trail Running is one of my favorite training routines. I love the cold air. I love the snow underfoot. It’s much softer than running on pavement. This morning it was 2 degrees F in Keystone Colorado. I had some other things to do, or I would have run first thing in the morning.

    My 12 year old son wasn’t up for Winter Trail Running, but decided to go snowshoeing instead. I gave him a little head start. After a while I started up the road behind Keystone Resort in Colorado. The Ski Patrol uses this road to haul injured skiers down to meet the ambulance. Sure enough at the gate to the road an ambulance waited. About a quarter mile up the road I stepped to the side to allow the snowmobile to pass. There was an injured skier in the sled, with red and blue lights flashing.

    For Winter Trail Running you have to experiment a lot with clothing and shoes. I try to dress as lightly as possible. This afternoon it’s about 15 degrees, but the sun will be going behind the ridge soon and the temperature will drop. I’ll also spend some time walking with my son. My plan is to run and walk in intervals. The Polar Graph shows my intervals best in the heart rate zone lines.

    For my Winter Trail Running, actually any trail running, I like to wear my Polar RS800CX GPS G5 Heart Rate Monitor. I like the graphing functions in Polar ProTrainer, and export the data to Google Earth so I can see it from a very different angle. Using the Polar WebLink software I can upload my data to PolarPersonalTrainer.com but that’s very clunky. I only do that to add my Training Load data. That way I can plan my intensity of training for the next few days to ensure proper recovery.

    Winter Trail Running Clothing

    Today for winter trail running I wore a thin long sleeve training tee as a baselayer. Over that I wore a thin zipper hoodie. For my outer layer I wore a windproof winter training jacket. I wore a thin beanie from TNF, and in the shadow of the setting sun, I flipped the hood up. For gloves I wore a pair of REI winter cycling gloves with the lobster configuration, since my hands were a bit cold last year in my fleece gloves.

    My lower body winter trail running choice was a single layer loose winter tight by Sporthill. I’ve never worn it before so it was a bit risky. It felt just a little warm in the sun, and just perfect in the shadows. On my feet I wore a pair of Injinji liners under a pair of Smartwool PHD thick mountaineering socks. They fit just perfect in the Salomon Men’s Spikecross 3 CS Winter Trail Running Shoes. I wore these on my hike up Quandary last winter. They have sharp square rubber lugs on the sole and steel spikes that stick in the ice. Tip: don’t put them on and walk on your tile or carpet if you can help it. They’re also noisy on asphalt.

    Everything worked fine. I did sweat a little bit, and it got chilled a lot during those times I walked with my son. As soon as I started moving I warmed up again quickly, so I think it was a good balance. The shoes worked good, and my feet were never cold. These are very thick socks though. One thing I noticed is that these shoes do have a bit of a heel, and it’s very stiff. If you’re used to flatter, or more cushioned shoes it will take a bit of effort to stay forward on your toes. Especially on the downhills.

  • Weighted Backpack Training – 60 lb pack

    Weighted backpack training is almost essential for mountaineering success. Most types of climbing and hiking adventures require you to carry a backpack. If you train with a heavy backpack previous to your trip, you will most likely do better.

    weighted backpack training is a necessity for alaskan mountaineering
    Glacier travel in Alaska with 85 lb pack. It’s much easier if you train hard for it first.

    I went in and put my bags through the x-ray, forgetting my passport in my bag, causing the poor door guards minor consternation, since I had to go past the gate to collect my passport, but could not pass the gate without one. We got it sorted out, and I went to the check in desk. My completely full backpack was only 14 kg. — Elbrus, My Waterloo (Seven Summits Quest)

    Some mountaineers will have a few different backpacks for different conditions. Having one just for weighted backpack training probably won’t work for everyone. If you use the one you will be using for your trip, you will have a chance to work out any bugs or fitting issues. Begin with an empty backpack, with just an old pillow stuck in to keep it stable in use.

    Hiking and Weighted Backpack Training – New Book “Rucking Simple Treadmill Training Guide” CLICK HERE

    weighted backpack training begins with an empty pack
    Start your workouts with a light pack and work your way higher and higher in weights

    Over time you can add more and more weight as you improve endurance and strength. For my weighted backpack training I use bags of rice, since we usually have a few in the pantry. I double bag them in the disposable thin plastic shopping bags in case the paper rips. The rice is very close to the same density and feel as other backpacking gear. Slide it in near your back, and stuff another pillow between the rice (or beans, wheat, etc.) and the outside of the backpack. This will keep it from moving around while in motion.

    Weighted Backpack Training helps you maneuver a heavy backpack
    Be strong enough to hold your 45 lb pack off balance

    When you get past 40 pounds or so, you’ll probably want to use something with more density. Unless you get a lot of rice or beans or get the 50 pound sacks if you can. Some people use gallon jugs of water. If you do a lot of weight training and have them handy and available, you can use weights. Steel plates, kettle bells, dumbbells, are all excellent additions to your weighted backpack training loads. Pad them well with pillows since they will have more inertia when you jostle in training. Just be very careful when setting the bag down. Dropping a ten pound bag of rice on your toe is very different from dropping a ten pound kettle bell on your toe.

    Exclusive Offer: Hiking and Weighted Backpack Training PROGRAM HERE

    weighted backpack training on a jacobs ladder machine can be risky
    Be very careful if training on a cardio machine that requires you to lean in odd angles

    If you have access to cardio machines, and it’s okay to use them for weighted backpack training, start slowly and be careful. Some machines, like the Jacob’s Ladder, can put your back at a dangerous angle. You might not be able to use as much weight on it. I like the Incline Treadmill the best, and just go steady and slow. I love the elliptical machines too, as it reduces greatly the impact you’ll feel while still providing a great leg workout. Set the resistance up high and go slow. This is more realistic for steep hiking. Stairmasters work good, and again, go slow. Also be sure you know how much you and the pack weighs so you can set it correctly. Most gyms have a scale that should go up to your weight plus the backpack.

    New Article: Weighted Backpack Training On Stairs

    Weighted Backpack Training Outside

    Some people can just toss 24 pounds of rice in a backpack and walk 3 or 4 miles every day in their neighborhood. That’s probably good enough for most people and adventures, and it’s a great scenic workout. Some people can do a lot of hill climbing, or better yet, steep mountain trail ascents. If that’s the case consider using gallon jugs of water for weight. At the top you can dump the water on a handy needy shrub. This lightens the load to protect your knees on the downhill.

    [amazon_link asins=’1501039970,B0793K6ZYG,1494385473,1502470055′ template=’ProductCarousel’ store=’sevensummits-20′ marketplace=’US’ link_id=’ff5151dd-0fa5-11e8-ad07-b15952575465′]

    Weighted backpack training can make hikes like Half Dome seem mild
    Carry a daypack on a long hike

    Weighted Backpack Training – What’s in the 60 lb pack?

    [monkeytools msnip=”http://monkeyplayr.com/playr.php?u=2116&p=4776″]

    Weighted Backpack Training Warnings

    • Don’t try so much to improve your speed and resistance. That’s nice and all, but your first priority in weighted backpack training is to increase the weight of the backpack. You can train up to a weight much higher than your anticipated on-mountain weight. This will make all your climbing feel a lot easier in general.
    • Be very careful and go slow. Putting on a heavy backpack can be difficult and a strain on back muscles that can cause damage or worse. If you start with a light pack and work your way up, you should be strong enough for each increase.
    • If you try to put your backpack on and just can’t do it, maybe that’s not the session for weighted backpack training. Relax and do something else.
    • Weighted backpack training is good for your core, but don’t try too hard. It’s potentially a lot of weight in a strange place at strange angles. Avoid hanging on for your life. If you have to, it means you have the machine set too fast.
    • In fact, mix it up. Do different machines, at different angles, at different speeds. Most hiking trails are a combination of things anyway. Try to avoid downhill under heavy load, just for knee and back safety.
    • I wear a tech tee under a cotton tee to provide resistance to the abrasion of the straps.

    Good luck, and train safe. Only do what you are capable of safely.

  • Bodyweight Exercise One Legged Band Sissy Squat

    I like to do some type of bodyweight exercise for warming up. It’s also great for working the smaller stabilizing muscles that I think shouldn’t be trained under heavy load. Unilateral bodyweight exercise is particularly good for the stabilizers and core.

    bodyweight exercise is one tool in quad development
    Quad definition is a combination of nutrition and training

    In this example, the one legged band sissy squat, it takes a lot of effort to stay level. It’s definitely not for beginners. You should get in a few hundred reps on the two leg version of this bodyweight exercise before trying the single leg version. Try it with your feet and knees together to work your way into it. This simulates the balance of doing it with one leg.

    If you’ve done the band version of the sissy squat all you need to do to convert it to the single leg bodyweight exercise is to lift one leg and place the ankle over your knee. Lower slowly the first time or two and don’t try the full range of motion until you get a feel for it. It’s quite different.

    Bodyweight Exercise Video for One Legged Band Sissy Squat

    [youtube https://youtu.be/VS3_5lYN4ac&w=640&h=360&rel=0]

    The blue band I am using is the Jumpstretch Strong Band #6 but similar products from EliteFTS will work as well.

    Setting up the bodyweight exercise for legs

    I’m looping mine over the pullup bar on my power rack. You can use just about anything that will hold your body weight and is a little over head high. Like the top of a door. Think simple. You could loop a piece of webbing with a knot in it and slam it in a solid door. Be careful though to make it strong enough. This is a bodyweight exercise. Test your system with full body weight before you drop backward into the squat.

    If you feel any level of pain or major instability stop immediately. You might have to work your way into this gently with something like one legged chair sitting or partial squats with one leg. I’m including the video for this easier bodyweight exercise below:

    [youtube https://youtu.be/HgeAHa9UuB4&w=640&h=360&rel=0]

  • Concept2 SkiErg Upper Body Warmup Series

    I have been using the Concept2 SkiErg for a while now for cross training primarily. I also like it as a warmup for upper body training. The resistance is a large fan, similar to the Concept2 rowing machines, only upright. Inside the post are ropes exiting the top at two rotating swiveling pulleys. There are 10 resistance settings, depending on your training goals and personal fitness level.

    Concept2 SkiErg upper body training
    Getting my back and Lats ready for Ice Climbing

    For my upper body warmup, I set the Concept2 SkiErg (Ski Ergometer – the movement simulates the arm/hand motion of Nordic skiing) to level 5, about halfway on the resistance scale. I mix it up a bit, but in general do a little Lat work and a little Pec work. I do some Core work and occasionally a little Tricep work.

    For a more advanced warmup, especially if I’m doing a few extra minutes of core work, I keep a wobble disc [Reebok Balance Board] or pad handy to add some instability. I like how it helps me use my core and leg stabilizers. It’s also a pretty cool mind game, since it’s tough doing a few different things at once.

    Concept2 SkiErg Warmup Video

    [youtube https://youtu.be/MQiU4QKMqIU&w=640&h=360&rel=0]

    Concept2 SkiErg Warmup Ideas

    Some things to keep in mind when using the Concept2 SkiErg for training other than as intended. The pulleys will go a lot of different directions. Experiment and see what different angles you can come up with. Keep in mind that the rope is thin, and limited in length. Don’t try too hard to go past the internal stop. Protect your back, keep your lower back flat. Don’t hunch unless, like ab curls, it’s part of the motion. Even then, do what’s right for your body.

    Remember it’s only a warmup. A good burn is a great feeling, but if you can’t lift your arms after, you might affect your other training negatively. Be very careful of what’s in your blind spots, or behind you. Notice that for the high and low diagonal movement I have to clear the racked squat bar.

    I use a Nordic Grip on the handles. This is probably the best way to use it, since it’s originally intended for Nordic ski training. But whatever works for you, just grab the handles and go.

    Concept2 SkiErg warmup for full body cardio
    Warm up for full body cardio on the SkiErg

    The Concept2 SkiErg is a little expensive to use only for an upper body warmup. I generally do a few 15 minute sprints at level 10 (max level) every week for cross training, as well as endurance training for Ice Climbing. I noticed a huge difference in my endurance last season after using it in the Fall prior. I’m looking for even better results this season, having worked my way up in levels over the Summer.

    If you have a Concept2 SkiErg and want to share your own warmup videos, please post them to my Facebook Page and share with all of us. We’d love to see what you have for us.