Author: Charles Miske

  • Catching Up With Some Stats

    In January I pre-tested working on a new goal. I started by trying to do the rough equivalent of 3 x 1.5 VK’s a week on the incline treadmill while I build up my strength. Some of them I had been doing with a 12 lb weighted vest. I should probably also work my way up to a 25 lb backpack.

    [Weighted Backpack Treadmill Training Guide]

    To be honest, it’s a pretty hefty expenditure of energy. It’s apparently not recoverable while also getting in 100 mile weeks on the Cycle Trainer and outdoor mountain bike riding.


    1.5 x VK = > 4.66 mi and > 4921′

     Following screenshots from my Wahoo Fitness App, connected to my Adidas Foot Pod

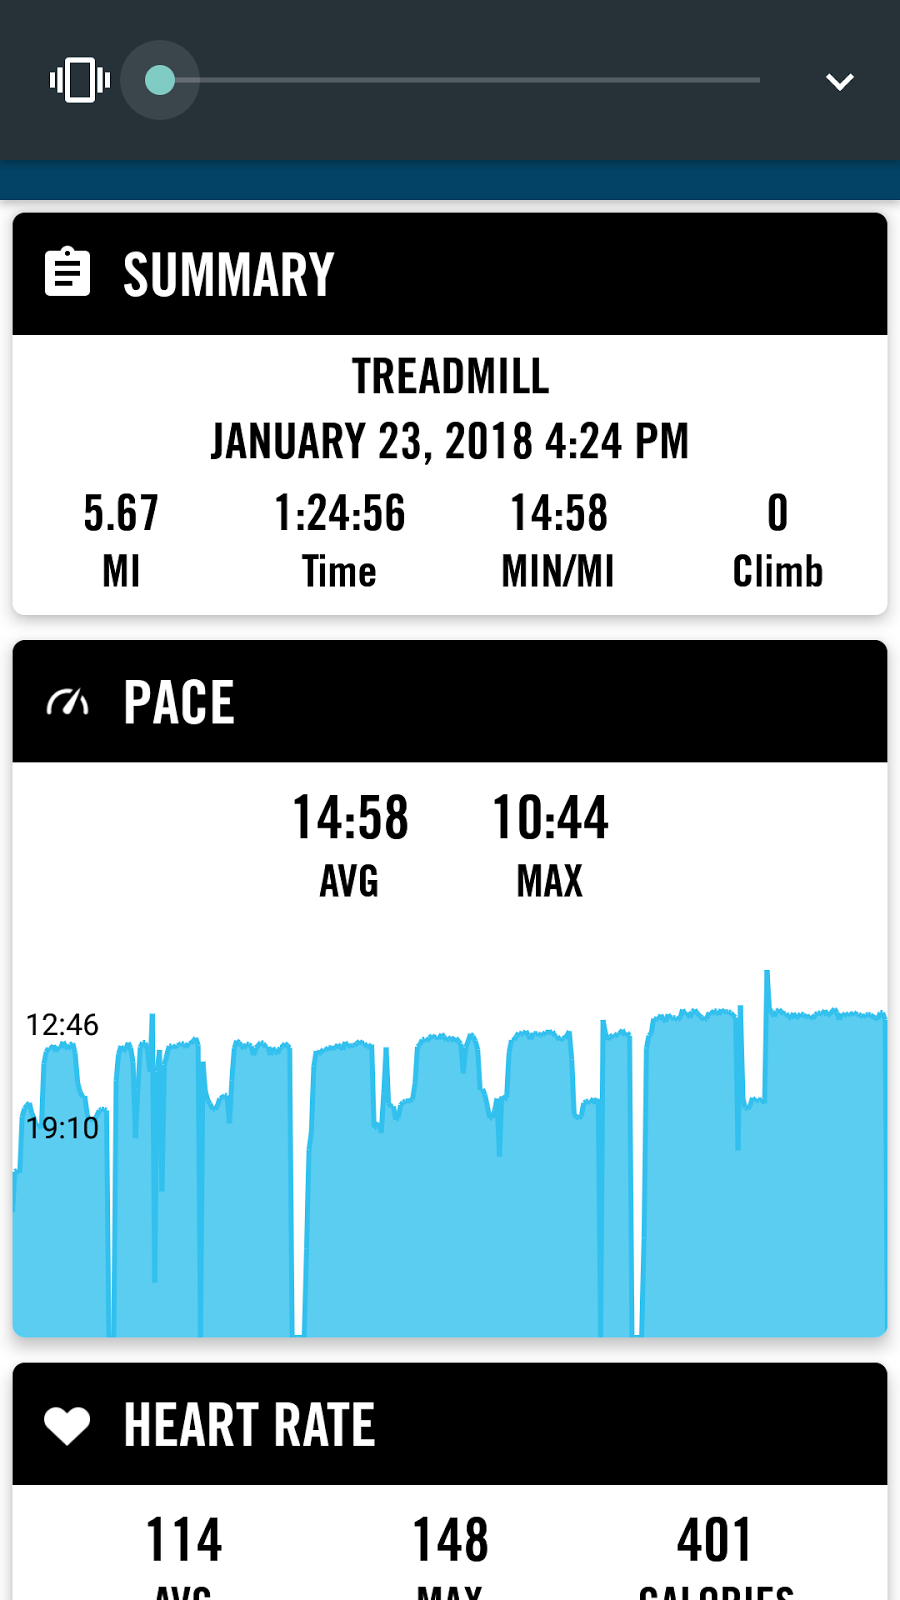
    The footpod calibrates itself whenever I run outside with the GPS on. It’s usually off a bit. I’m not terribly keen on it, but it’s what I have that connects between my phone and foot.


    Above are examples of the type of stats I accumulate from my workout. It’s pretty strenuous, and I am not able to do it completely hands-free at this point.

    Where did I get the idea to do 4.5 x VK in a week?

    Let’s examine the details about what a VK means. A VK is about 1000 meters of vertical gain over the course of about 5k of distance. Multiply that by 1.5 for the daily goals and you get 4.66 mi with 4921′ of vertical gain per workout.

    Multiply that by 3 and over the course of the week you get in a bit less than 15 miles and a bit less than 15,000 vertical feet.

    A well-known author on mountain fitness has expressed that training goals in the 15,000′ per week range put you in an elite group of successful mountain sports folks, and I thought that sounded pretty cool. When I was training for Elbrus Race 2010 and 2013 I was doing between 10k and 15k per week regularly so it sounded about right.

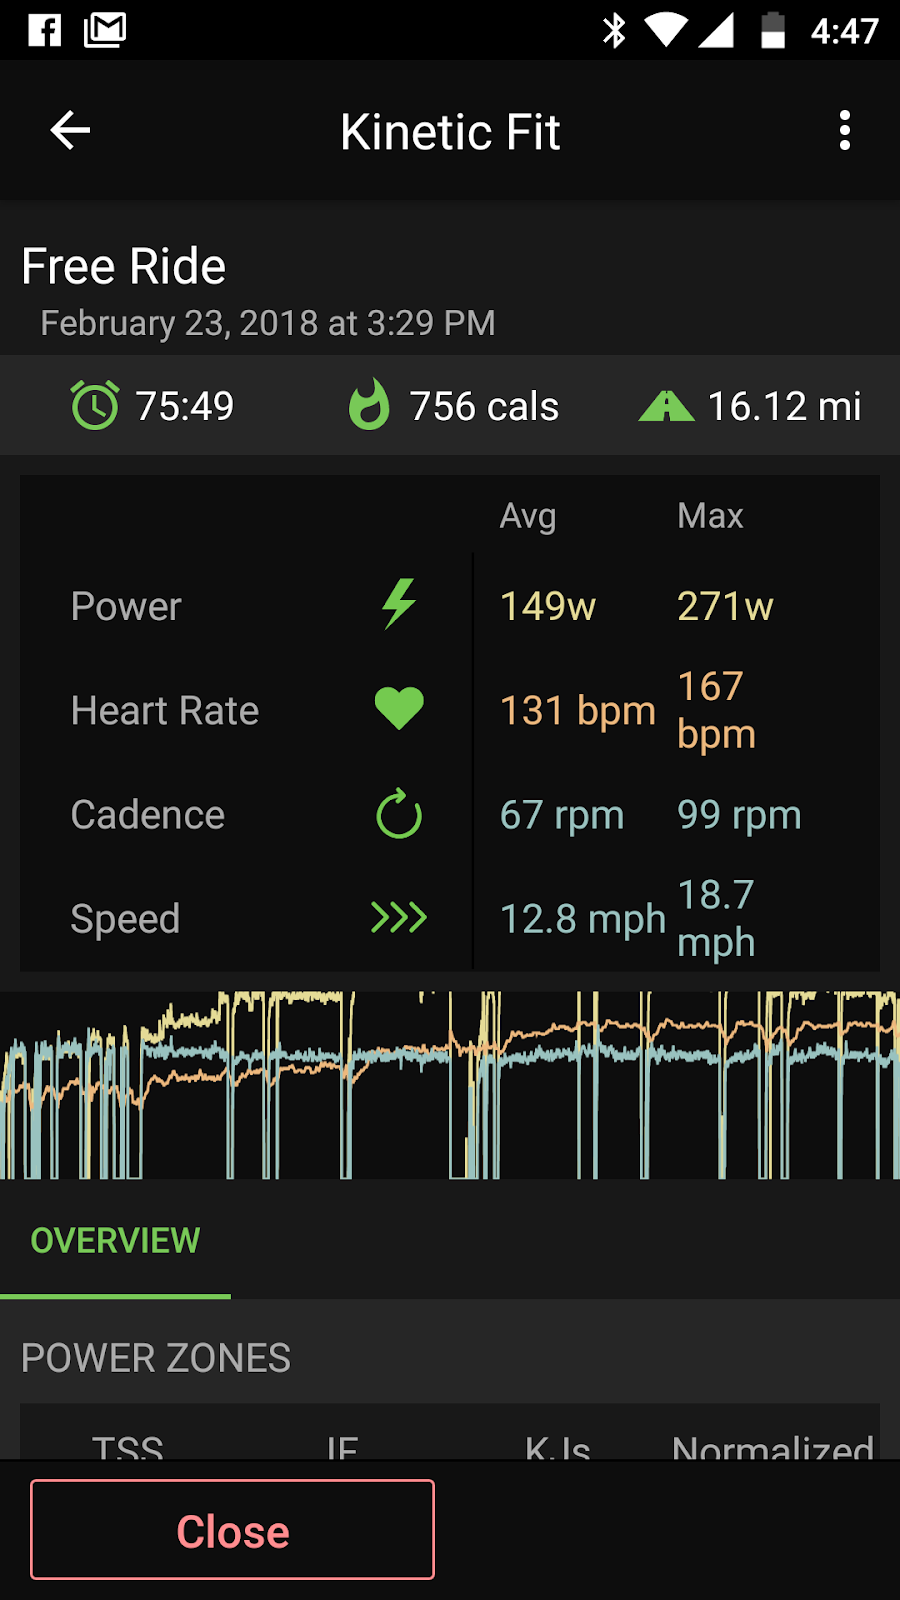
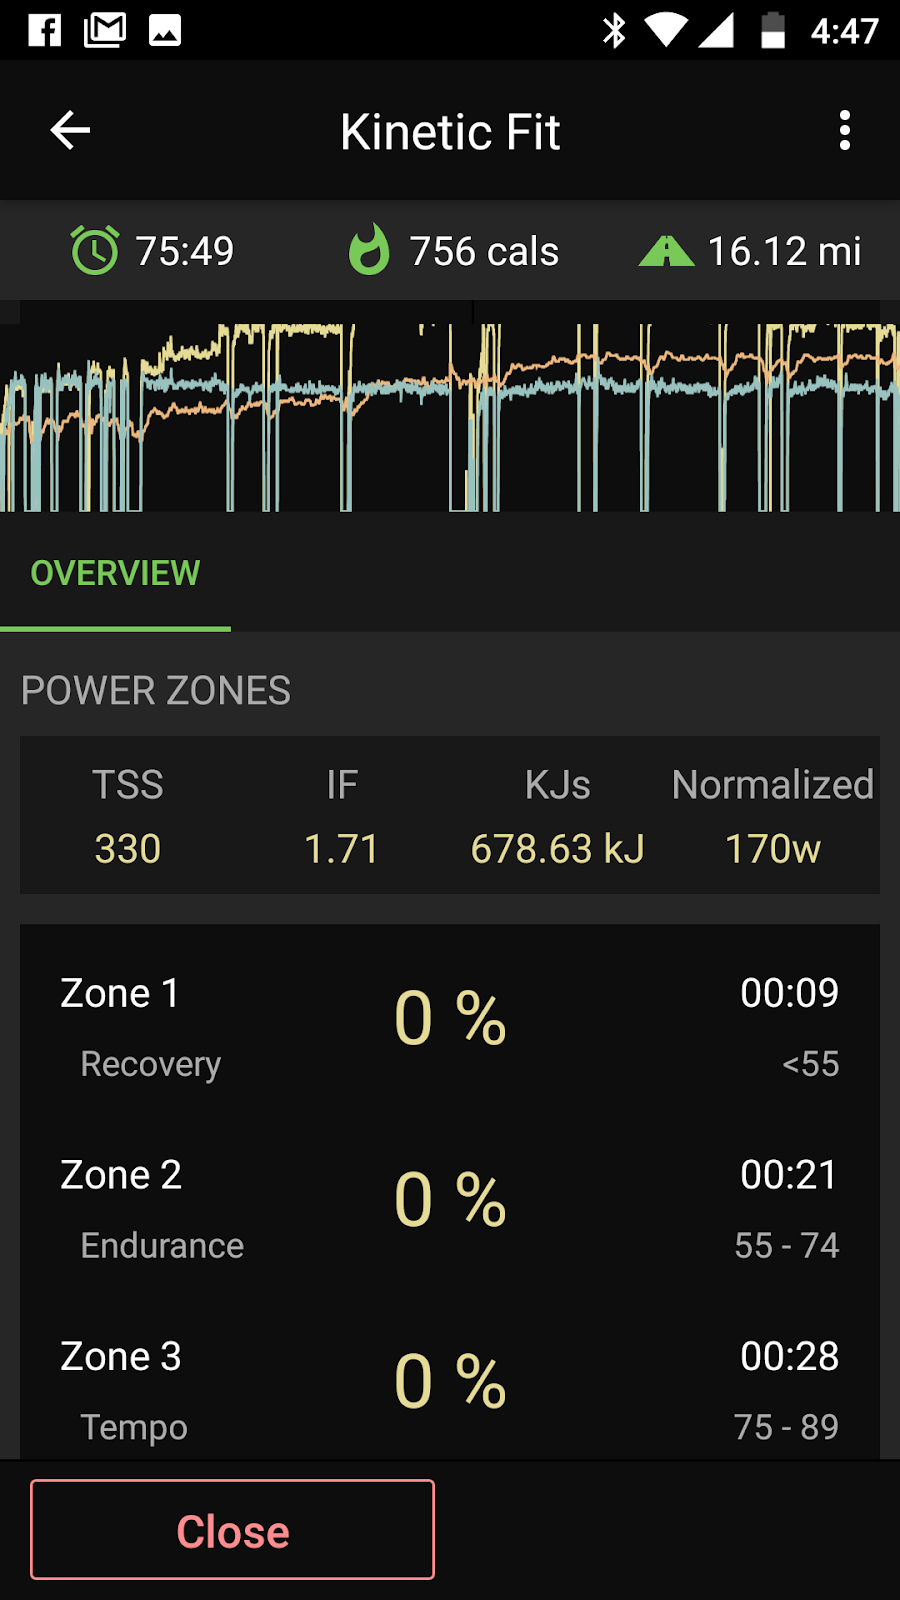
    Example stats from a recent trainer ride showing energy expenditure

    Sadly, my position as a certified Mountain Bike Coach requires me to be able to ride with my team for most training sessions, which requires me to maintain a high level of riding fitness. So right now I am not able to sustain that level of training in the time period I have.

    By time period I have, I mean that I only have about 90 minutes per day average to complete this workout, so I have to maintain a speed that gets my vertical in while also getting in my approximate VK simulated workout.

    I pretty much took February off from the treadmill and just recently added in Stairmaster workouts to at least break the monotony of sitting on a trainer for 90 minutes per day.

    I did some math and think I have an idea of how to at least get in the vertical, if not the miles. I’ll report back here when I get that tested out.

    Powered by WPeMatico

  • Indoor Training TMI – February 25th Edition

    I’ve been on the trainer a lot this past season. I got on right around the end of the Utah League NICA High School Mountain Bike Racing season. I did a few outside rides here along the Wasatch Front, weather permitting. I’ve also been to St. George a few times, and out to Moab once. That’s a whole ‘nuther story. For sure.

    Anyway.

    One thing I think makes a big difference is a two-bolt seat-post. Yep. Two bolts. Why?


    There’s a big difference IMHO between sitting on a trainer in the garage, and riding outside. For one thing, you have a tendency to not balance your weight on your feet with your butt up off the saddle, even a few millimeters, enough to get that precious groin blood flowing again. For another, you’re not increasing and decreasing your inclination (going up and down rolling hills) which also moves you around on your saddle some.

    With a two-bolt seatpost and a properly-sized allen wrench handy, you can adjust your seat angle on-the-fly. 


    Yep. While sitting on your trainer you can reach down between your legs, or around behind your butt, insert the wrench, and wiggle it a little bit in and out to get the right angle for your poor suffering groin and butt.

    Tightening a screw brings that part of the saddle down, and loosening it allows it to upward. It works in conjunction with the opposite screw.

    As an example, to bring the nose of the saddle down, loosen the rear bolt, and  tighten the front bolt. Does that make sense?

    I’ve discovered for myself that I have to pause pedaling to work on the front bolt, but can do the rear bolt while riding. 

    I’ve noticed slight differences in angles with various cycling bibs I wear for indoor training. I’ve also notice a slight difference in the fore-aft positioning of the saddle. And of course, I’ve noticed a big difference when I use a slightly higher front tire stabilizer slot.

    Maybe I’m just really picky?

    If you’re spending 6+ hours a week on an indoor trainer, (in my case a Kurt Kinetic Road Machine with the Inride power meter sender) you’ll be much happier with a well-adjusted seat.

    Stay tuned for some information about the saddle I chose for my indoor trainer too.

    Below: screenshots from my Kurt Kinetic Fit App, receiving data from my Kurt Inride sender on my Kurt Road Machine trainer, my Wahoo Blue SC (speed cadence) sender on my bike, and my Suunto Smart heart rate sender. What a mashup! Yes, it works great. I’ll let you in on how I got them all to play nicey-nicey here in the next few weeks if you can be patient.

    Powered by WPeMatico

  • Training With A Weighted Backpack On Stairs

    Training With A Weighted Backpack On Stairs

    If you’re needing to improve your fitness for hiking, training with a weighted backpack on stairs is an excellent choice. In this video, created for one of my Mountaineering Fitness Programs, I demonstrate a simple routine of stair walking while wearing a lightly weighted backpack. Some things to consider before you attempt adding this into your own fitness routine are listed here.

    Video: Training with a Weighted Backpack on Stairs

    [youtube https://youtu.be/pDA8HG6LUlQ?w=640&h=360&rel=0]

    First of all, before you put on a backpack loaded with any weight, be sure you are able to walk the stairs without one. This almost goes without saying, but you’d be surprised at how some people want to run before they can walk.

    Next, make sure the backpack you’ve selected works well with the motions of walking both up and down stairs. You don’t want the bag flopping around on your back, especially if the weight in the bag is an appreciable percentage of your weight. 10% or more is plenty of weight to start “The Tail Wagging the Dog” as they say.

    If your stairs are outside, like these are, be sure that they are safe for use for training. This includes water, oil, or other slippery surfaces or coatings. Be careful of critters like mice, squirrels, unicorns and the like.

    For most people, about 20 steps is a good number of stair treads for training. If the stairs are too short there are too many stops to turn around and it bogs down training quite a bit. More than 20 is fine, but if you want a more HITT-like session of weighted backpack training, 20 makes for a good sprint up, and great rest returning to the bottom slowly.

    [amazon_link asins=’1501039970,B0793K6ZYG,1494385473,1502470055′ template=’ProductCarousel’ store=’sevensummits-20′ marketplace=’US’ link_id=’ff5151dd-0fa5-11e8-ad07-b15952575465′]

    If You’re New to Weighted Backpack Stair Training

    Start slow, without very much weight. See what you are able to recover from depending on your fitness goals. You might progress to sprinting up the stairs with 20% of your bodyweight in that pack. You might just walk up and down with your lunch in your pack. Each of us is in a different place.

    Be sure to check out the other articles in the Weighted Backpack Training series.

    NEW BOOK: Rucking Simple Treadmill Training Guide – NOW ON AMAZON


  • Under Armour Eyewear – Capture Sunglasses

    These sweet sunglasses from UA have become my go-to eyewear for nearly all conditions in the outdoors. Here is a link to a video I put up on YouTube

      Box Opening UnderArmour Capture Shiny Black Blue Storm Polarized Sunglasses

    Showing off my UA Capture Sunglasses – see that blue reflection?

    I took these out just a couple days after I shot the box opening video linked above, and fell in love with them rather quickly. I have usually used a couple of other brands for when I’m outside in my contacts, but haven’t used anything except these now since I opened that box. They’re really that good. I’ll share more with you in the coming weeks.

    If you want to read more about them, here is a link to check them out on Amazon below.


    Powered by WPeMatico

  • Diamondback Recoil Upgrade – Air Shock

    Last year, 2016, my son started mountain bike racing. Previously he’d done road racing with the FFKR jr. devo team up in Salt Lake City. He’d attended a couple of their training camps and got interested in cyclocross (CX) and even took state points leader in his age group in the 2015 fall racing season.

    Dallin at the awards banquet for 2015 UTCX

    For 2016 he decided to race Mountain Bike at the Lone Peak High School registered with the Utah High School Cycling League and NICA. I decided to become a NICA certified coach, and passed the requirements for the Ride Leader position. This has been upgraded to Level Two Coach for 2017. More on that later though.

    The team was sponsored by Fezarri and we decided to get him a Wasatch Peak hardtail at the team discount. I found a really good deal on a Diamondback Recoil full suspension bike and ordered it. It
    was heavy, somewhat clunky, but it would get the job done.

    Diamondback Recoil 27.5

    Now, I’d been a roadie for a good 40 years. Seriously. No kidding. In my wild teen years in California I’d hooked up with a friend who introduced me to sweet light brazed lug double butted tube construction. I was hooked. Over the years I ended up as a bicycle commuter, hitting 150 mile weeks regularly. So now this big knobby tire thing. Argh!

    Pretty soon after getting it, even on the light duty trails we ran with the beginner team I was in charge of, it became apparent that at my weight the rear spring, a coil-over design similar to a dirt bike but without the hydraulics, wasn’t working out as nicely as I’d hoped.

    Spring Coil – stock on Diamondback Recoil

    I dug around on Amazon and found an air shock replacement from Asia that was way less than the “American” counterparts that you usually think of when imagining the perfect rear air suspension on a mountain bike. I won’t name names. Like less than $80. The ratings for the DNM Rear Air Shock were good, so I measured my spring shock to verify the fit and ordered it.

    The inner diameter and width of the supplied bushings was slightly off, so I pressed them out (tough, but doable with a clamp and threaded hex head bolt) and used the Diamondback bushings, which fit perfectly in the shocks.

    The hardest part was holding the rear triangle up in place while holding the end of the shock in place, while threading the bolt through while keeping the bushing centered. Alone. Fortunately I had a good Bikehand Pro Mechanic Bike Stand to hold the bike in place at waist level while working on it.

    The DNM shock included a fairly readable manual to let you know what pressures to load the main and rebound cylinders with, and I messed around with it for about a half hour to get the bike to settle in at the right pressure.

    Total time for this was about 3 hours, while answering the phone, checking email, verifying a thing or two on Youtube, etc. You could probably do it in an hour or less without the messing about.

    NEXT: Derailleur replacement. Drat.


    Powered by WPeMatico

  • Training Program Adjustment Phase Explained – Hikercize

    One thing a lot of canned training programs skip or gloss over is the “Adjustment Phase” which is one short cycle, 3 to 6 weeks, during which you adjust from Non-Training Life to Training Life.

    Check out the video for more, and how we address this issue in Hikercize at http://hikercize.com/take-the-challenge

    Powered by WPeMatico